
After six months of work, it’s great to finally have version 2.0 of UX Write done. There’s some significant changes in this version, and most importantly, a new pricing model.
Try out UX Write for free
UX Write is now available via the “freemium” model. The basic edition, which can be downloaded for free, provides the core essentials – creating and editing HTML and Microsoft Word documents, syncing with various cloud services, and basic formatting like bold, italic, underline, lists, plus images and tables. It also includes heading styles and the outline view for navigating documents.
The professional edition, available via either a subscription or purchase option, has everything else. This includes custom styles and formatting, print/PDF export, structural features like a table of contents and cross-references, plus editing tools like find & replace, spell checking, outline editing, and word count (see the app website for full details).
You can upgrade to the professional edition via in-app purchase. There are two ways to go: you can buy the app straight out for $25, which is the same as the previous price. Alternatively – and this is what I recommend if you want to try it out for a while – is to subscribe at $1/month. Subscriptions are renewed manually, so you can decide at the end of the first month to extend your subscription or purchase the app if you feel it’s working well for you.
If you’ve bought UX Write prior to the release of 2.0, you automatically get access to the professional edition – there’s no extra payment required.
Updated look & feel
Version 2.0 introduces a brand-new visual appearance, courtesy of a new member of the team, Ian Weatherseed. Both of us have put a great deal of thought into how to best represent what the app is about, and how to make the overall experience more intuitive. Ian has a very different background to me – being much more oriented towards to the human rather than technical aspects of a product, and I’m pleased with the results of his work.
First of all is the new logo and icon, which unlike the old, skeuomorphic one, doesn’t appear completely out of place on an iOS 7 home screen:
![]()
Next is the colour scheme and background, which are designed to make the app stand out from the plain iOS 7 defaults. These were some difficult decisions, and I know it’s going to generate some controversy, but overall the feedback on it has been pretty good, though it might take a little getting used to.
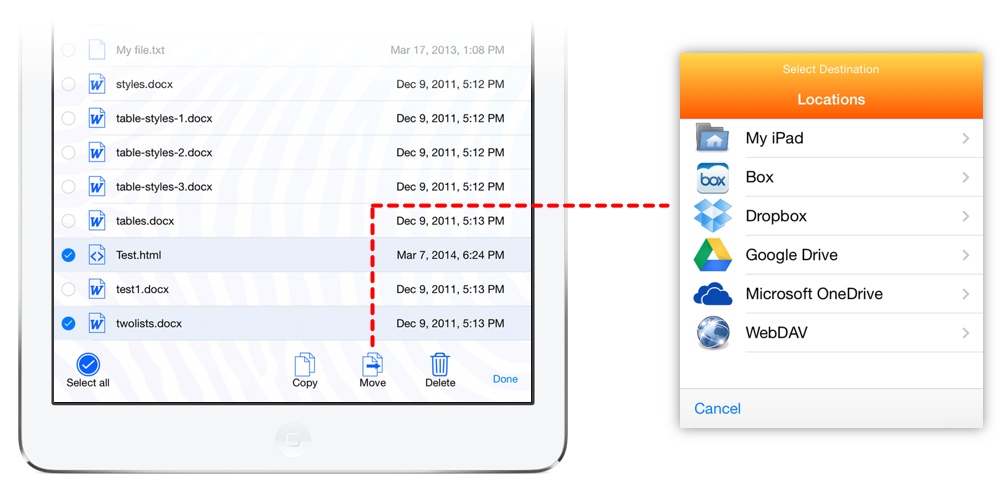
The file manager has also been reorganised so that the set of storage locations (local storage and cloud services) is now on a separate screen to the folders where you store your files. This means less clutter when browsing a folder, and a more intuitive setup experience on first launch, where you start off with the following screen:

Google Drive and OneDrive support
Microsoft made a big splash with the introduction of Office for iPad, but unfortunately decided to only support their own cloud service, OneDrive. Google did the same thing when they bought QuickOffice, even going so far as to remove support for Dropbox.
UX Productivity is not in the cloud business and has no incentive to do something as dumb as this. I really don’t care what you use – the only limiting factor on the number of services supported by UX Write is the development effort required to support each one, as each has a different API and slightly different way of doing things. But I believe that choice is very important, so you’ve now got two extra options: Google Drive and OneDrive.

In fact, if you have all your files on, say, Dropbox or Box, and wanted to use them with Word on your iPad, you could download the free version of UX Write and use that to copy them across, and then switch over to Word to work on them. Or… you could just use UX Write itself 😉
Footnotes and Endnotes
By popular demand: You can now use footnotes and endnotes in your document. This has only become possible now because of the LaTeX support (see below) required to typeset them properly. HTML itself provides no way to place footnotes at the bottom of the page (since HTML has no concept of pagination), so they’re displayed in-line during editing, as shown below:

If you typeset your document using LaTeX, then the print or PDF output will have the footnotes positioned correctly at the bottom, and the endnotes will appear at the end of the document. If the file you’ve created is in MS Word format, then they will also appear in the expected place when you view the document in Word.
Moving & copying files
I’ve written before about the complexities of moving files and folders in the context of file synchronisation. UX Write has been designed to work entirely offline, and there’s some rather obscure things that can go wrong if the same item gets moved around to different places on separate devices, and later synchronisation runs into conflicts – or, even worse – loss of data. This is the reason that moving and copying hasn’t been supported until now.
There’s been a lot of demand for these features though so I’ve now implemented them in such a way that avoids these problems by performing the operations synchronously. This means that in order to do a move or copy you have to be connected to the Internet at the time, and the app will send a request to the server to carry out the transfer, and force you to wait until it’s completed. This is a simple solution that avoids the risk of data loss, and I think will suffice in the vast majority of cases. Uploads still happen in the background as usual, and you can still do everything else offline.
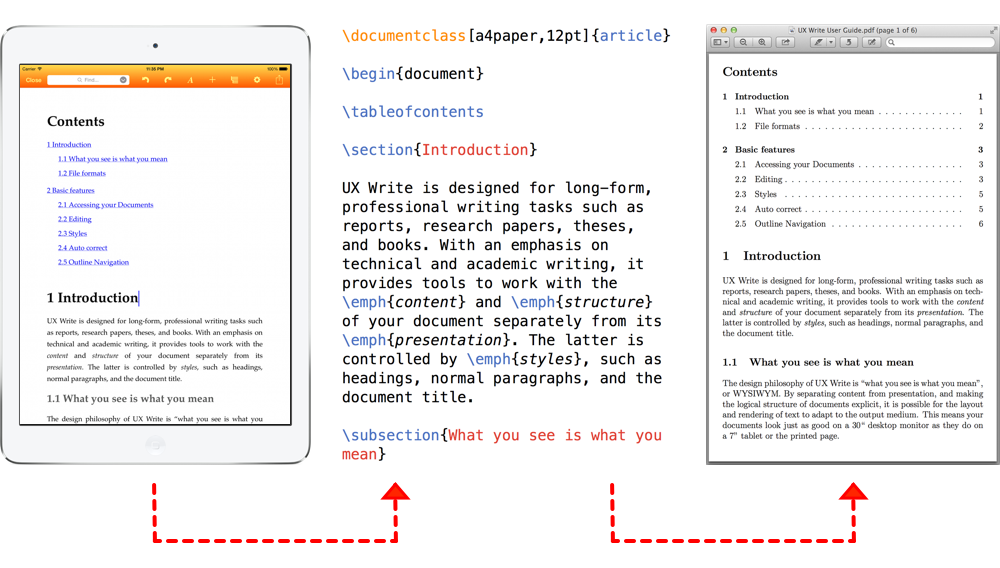
LaTeX typesetting
Finally – and this is a big one – UX Write now includes a built-in port of LaTeX (based on XeTeX) that runs directly under iOS. If you go into “Typesetting” under the settings menu and select LaTeX, then when you tell UX Write to print or generate a PDF, the app first translates the HTML representation of the current document into LaTeX source, and then runs that through LaTeX to produce a PDF:
While the current LaTeX support works for simple use cases, I still regard it in many respects as an experimental feature. There’s lot of aspects that I’ve yet to get working properly, including font support for non-English languages, plus import of files in .tex format – currently the LaTeX support is limited to PDF output only. As with everything else in UX Write, this is an evolving codebase that takes time to get right. In future updates, you’ll see support for equation editing, BibTeX, importing files, extra page layout options, and more.
Try it out today
With the new basic edition now available for free, there’s no longer any reason not to give UX Write a try. If you’re new to the app, you’ll be able to get a pretty good understanding of what it’s like to use, and there’s no time limits or third-party advertising there to annoy you. The only difference between the two editions is the set of features available. And if you do decide to try out the professional edition, you can sign up for a month and see how you go, before deciding if you want to continue subscribing or purchase the app.