Tabs and multiple spaces

I often get questions about why UX Write doesn’t allow you to insert tabs into a document, or place multiple spaces after a period. Some people have also asked about why existing tabs in a Word document show up as a grey [tab] marker. In this post I’m going to explain why this is.

UX Write uses HTML – the language of the web – for displaying and editing documents. When you open and save a Word document, UX Write converts it to HTML and back again. The HTML content is displayed on screen using a software component called WebKit, which is the same layout engine as used by Safari (and formerly Chrome). Every document you edit in UX Write is quite literally a web page; the only difference with a web browser is that your document is stored locally on your device, not published online.

HTML provides a slightly different set of layout features to Word. While most features can be converted back and forth without problems, there are some features present only in HTML, and some present only in Word. Thus, UX Write can never provide a 100% faithful rendering of all Word documents, and doing so has never been a design goal.

I chose HTML partly because it’s so widely used – as the foundation of the web – and partly because it enabled me to use an existing layout engine, rather than spend years writing my own. HTML is also much better designed than Word, and with a minimal amount of training a person can reasonably read and write HTML code directly. This is not the case with Word documents.

Tabs

HTML doesn’t support tabs. There’re simply not used not the web.

While I’m not sure of the exact rationale for the W3C (who designed HTML) to exclude tab support, I suspect the reason is because it’s unnecessary, in the sense that everything you can achieve with tabs you can also achieve without.

There are two main use cases I’m aware of:

1. Paragraph indentation. This can be achieved in both HTML and Word by changing either the left margin or text indent formatting properties of the paragraph or style.

In UX Write, go into the formatting menu and then either direct formatting or the style manager, and set these as appropriate. I recommend creating a style for the indented paragraph, so that you can do this again easily by selecting the style from the formatting menu, and later adjust the amount of indentation if you so wish.

2. Tabular data. This can be achieved in both HTML and Word by using tables, either with or without a border. Instead of adjusting tab stops, you adjust column widths. Instead of setting the alignment of a tab stop, you set the alignment of a table cell or column.

Even better, with tables it’s possible to create a custom style that defines the horizontal alignment, vertical alignment, and border appearance once and then use this for all tables in your document, so you don’t have to go formatting each manually.

Unfortunately UX Write doesn’t support customising table formatting at present, but this is coming in the near future. However, any customisations you make in Word will be retained by UX Write. I’m also considering providing the ability to convert tabs to a combination of indented paragraphs and tables when the app encounters a document containing these, so you don’t have to do so manually.

Multiple spaces after a period

By default, HTML collapses all whitespace in the source file, which means that any consecutive sequence of one or more spaces or newline characters in the HTML code is displayed on-screen in the same way as if there were a single space. If you view the source of a HTML document, you’ll typically see that a single paragraph is actually spread over multiple lines, e.g.:

<p>Here is a HTML paragraph. Its
content spans multiple lines in
the source file, for convenience of
editing in a text editor, but the
author's intention is to have it
displayed using word-wrapping according
to the user's browser window size.</p>

In a sense, HTML considers a sequence of space and newline characters simply as an instruction: “Don’t put the surrounding characters next to each other”. In fact, if you use justified text, the amount of space between different words will vary, as the layout engine will space the words out appropriately to ensure that both the left and right edges of all lines except the last line up with the left and right margins. In HTML, and most other file formats, spaces are not a fixed width character, and two spaces are considered no different than one.

While I’m aware of the controversy surrounding the “one space or two after a period” debate, I think it’s a pointless one. This problem was already solved more than 30 years ago by Donald Knuth when he created TeX, which automatically adds a small amount of additional whitespace between sentences, and gives higher priority to inter-sentence spacing than to inter-word spacing when it needs to stretch out a line when performing justification. If you really care about typography this much, you’ll already be using a system like TeX or LaTeX to prepare your final publication-ready output. The image below shows the same two sentences as typeset by LaTeX, Safari, and Microsoft Word; in all three cases, the text was entered with only a single space after the period.

Sentence spacing

The good news is that built-in LaTeX typesetting is coming to UX Write in the very near future. Most of my development effort over the past couple of months has been in porting LaTeX to the iPad, and when this work is complete you’ll be able to take advantage of the beautiful typographic output it produces when printing or generating PDF files, producing much more professional-looking results than is possible with Word. Stay tuned for more on this.

Why does typing two spaces insert a period?

The iOS text entry system has a built-in feature, which I believe is on by default, that allows you to type two spaces in succession to get a period, as a shortcut mechanism. This is an option which can be configured under the in the Settings app, under General > Keyboard > “.” Shortcut:

Period shortcut

While you can turn this off on a system-wide basis, the setting only applies to apps which use Apple’s built-in text entry mechanism (which most do). However, for apps like UX Write that provide their own text input handling, changing the setting has no effect. Unfortunately, to the best of my knowledge Apple do not provide any mechanism by which apps can determine whether this setting is on or off, so it’s not possible to automatically adjust the input behaviour based on this.

UX Write re-implements this feature itself, to match the behaviour seen in other apps when the setting is on. Before I implemented this, I received a number of complaints about the fact that it didn’t add the period after pressing two spaces, which is why I added support for it. Since then, I’ve received only a handful of complaints about the fact that it does add a period, so of the two options I’ve concluded that it’s better to have it on. This also seems to make sense given what I’ve discussed above about the inability (and pointlessness) of typing multiple spaces manually in a document.

Understanding Layout in UX Write

I sometimes get questions from people asking why some particular layout-related aspect of UX Write doesn’t work the same way as in Microsoft Word or Pages. The answers all invariably come down differences in the approaches these programs take to layout — that is, the way in which they display the text you’ve entered on screen, and the level of control given to you over how this layout is done. Because UX Write is based on Safari’s layout engine, its capabilities depend entirely on what is possible to do on a web page, which excludes certain features like tabs, page breaks, footnotes [1], and columns [2].

Microsoft Word, OpenOffice Writer, and Pages are all based around the idea of WYSIWYG (What You See Is What You Get). This is a visual approach to writing, where the position of text and other elements in the document is remains unchanged regardless of how you are viewing the document, whether on-screen or in print. This model is appropriate for people who need precise control over exactly how their final published document will look, and want to have that layout control combined with text editing facilities in the same program. If you have these needs, then UX Write is not a good choice for you as it specifically does not attempt to provide a fixed layout, for reasons I’ve written about previously.

UX Write, HTML, Markdown, LaTeX, and LyX are based around the idea of WYSIWYM (What You See Is What You Mean). This is a structural approach to writing, where you add text, sections, subsections etc. in an abstract manner, and the way in which they are actually displayed depends on the circumstances in which the document is being viewed. Often referred to as the separation of content and presentation, this model is appropriate for people who care only about the content of their writing, and are happy for the presentation to be tailored to suit the output device (tablet, phone, desktop, print), subject to some level of customisation (such as fonts and colours) defined in a stylesheet. If you have these needs, UX Write is really your only choice on the iPad right now — I’ve still yet to see another app which properly supports even styles, not to mention automatic numbering, table of contents generation, and other features that depend on structural information.

You use this latter model every day when you browse the web. Well-designed websites [3] will wrap their content to the width of your browser window or your phone/tablet screen, and this will change as you resize your window or rotate your device between portrait and landscape. On some desktop browsers, you can also change the font size to what is most comfortable for you to read. E-book software like iBooks and Kindle also follows this model. If you’ve ever tried to read a PDF document formatted for a full-size A4 page on your iPhone or iPad mini, you’ll undoubtedly have been frustrated by the small text and excessive scrolling; reflowable text avoids this.

Neither the visual or structural approaches are inherently “right” or “wrong” — everyone has different needs, and you should pick the app that’s right for you. UX Write is very much built around the structural approach, because it’s intended for long-form technical and academic writing, though is useful in many other contexts as well.

I realise now that the current messaging on the app’s website is too ambiguous — it compares UX Write to Pages, which I now think is a pointless comparison given that they’re designed for different types of users. I’ve actually found it quite a challenging task to communicate what UX Write is to an audience unfamiliar with the structural writing approach, and the app often gets judged badly when measured on those grounds. As part of a larger rebranding exercise I’m working on with a colleague of mine, I plan to redo the website to try and clarify the app’s focus on technical and academic writing, and make the differences from visually-oriented word processors clearer.

[1] Though they can be “faked”, like this

[2] Columns have actually been added recently to the web standards, but without pagination, placing an entire document in columns would cause the second column to start half-way through the document. The reader would need to scroll down the entire first column, then right back up to the top, before they can read the second column. That’s not good.

[3] And I don’t consider this blog particularly well-designed, though the latest WordPress update does seem to finally implement text wrapping when you resize the window, and it’s readable on an iPhone without zooming.

Footnotes, Headers, and Footers

Among the features I’ve had the most requests for are the ability to add footnotes to documents, as well as custom page headers and footers. These are standard features of print-oriented word processors and many people naturally expect to find them in UX Write. So I thought I’d give an outline of my plans for supporting these. There’s some rather tricky issues involved due to the web-oriented nature of the app, but fortunately these are solvable.

WebKit for editing

UX Write actually doesn’t do any layout itself; it is entirely dependent on the WebKit rendering engine, as used in Safari and Chrome, for displaying all content. WebKit is based on HTML and CSS, the document structure and formatting languages of the web, which work somewhat differently to the file formats used by print-oriented word processors such as Microsoft Word and OpenOffice Writer. The differences — in particular, HTML’s continuous, non-paginated nature — have important implications for the feature set that is possible to support in UX Write.

Writing a (sufficiently capable) custom layout engine is a task that takes a sizeable team of people and many years of effort, which simply wasn’t a viable option for this app. Relying on WebKit makes it possible to invest all development resources entirely on editing capabilities, rather than all of the logic to calculate where each piece of text goes and how it’s formatted. This is why UX Write possesses so many more features than its competitors — all the hard work of layout is already taken care of. WebKit is also built in to iOS, which makes it a very convenient choice for use in an iPhone/iPad word processor.

By using WebKit, UX Write inherits both the capabilities and limitations of HTML. Although HTML has a lot of great features — styles, tables, images, lists, hyperlinks, and a ton of formatting options — it’s not particularly good at paginated, print-based output. On the web, there’s no notion of a document being divided into a series of (virtual or real) sheets of paper like in a traditional pure-WYSIWYG word processor. I’ve previously discussed why relying on explicit pagination during editing doesn’t make sense in the context of writing for e-books or the web, but it is relevant for documents that are ultimately destined for print output only. Unfortunately, among the features HTML lacks are — you guessed it — footnotes, headers, and footers.

Currently, UX Write uses WebKit for both editing and print/PDF output — but there’s some changes on the way for the latter.

LaTeX for printing

WebKit isn’t the only layout engine out there of course. Another popular one is Donald Knuth’s famous TeX typesetting engine, which was designed in the early 1980s for high-quality presentation of scientific and mathematical publications. It was later used by Leslie Lamport as the basis for LaTeX, a high-level set of macros for structuring documents that are ultimately typeset by TeX to produce printed output. I’ve used LaTeX for producing all of my academic publications (though doing my writing in LyX, a graphical front-end), and it’s pretty much the de-facto standard for academic publishing in computer science, mathematics, physics, and other scientific fields. After being around for more than 25 years, LaTeX is still regarded as one of the best quality typesetting engines out there.

LaTeX provides excellent support for print-oriented features such as footnotes, headers, and footers, plus many others such as page-number references and embedding of hyperlinks and outline navigation elements in PDF files. It’s a much better option than WebKit for generating print output, and making use of it in UX Write will make it possible to provide these features.

There’s one major problem with LaTeX however — it is only able to run in batch mode, and cannot provide real-time updates to the typeset document during editing, as WebKit can. What batch mode means is that a document is supplied to LaTeX, it goes away and does its thing, and then a few seconds later you get back a PDF file with the output. This means that it can only realistically be used for printing or exporting PDF files, and leaves us with WebKit as the only viable option for actual editing.

It’s always been a goal of mine to have built-in LaTeX support in UX Write. My hopes were initially dashed after I read about the immense difficulties the developers of Texpad had encountered while attempting a port to iOS due to the complexity of the codebase, however they eventually achieved success with a much simpler LaTeX distribution than that which is typically used on desktop systems. Upon learning of this I realised two things — that it is viable to do, and that I should work with them.

So LaTeX provides the solution to the problem of producing high-quality print output with all the layout features typically expected. However because getting this integration working is quite an involved task, I’m going to be doing it in two separate stages:

Stage 1 (soon): External typesetting

Initially, UX Write will provide an option to export the current document as a .tex file, which can either be converted to a PDF directly on your iPad or iPhone using Texpad, or on your desktop system using an existing LaTeX distribution such as TeX Live.

Installing and using LaTeX on a desktop system requires a fair bit of technical proficiency, and is something I only recommend for advanced users who are already familiar with the process. Texpad is a much easier solution, as it’s just as easy to install as any other iOS app, and will integrate seamlessly with UX Write. I’ve been working with the Texpad developers over the past couple of months on getting this integration working, and we’re getting fairly close to having it available.

Stage 2 (later): Built-in typesetting

Eventually, UX Write will contain a built-in version of LaTeX that it will run directly when you print or export to PDF. Everything will be done within the app, without requiring any third-party software, and it will be just as seamless and easy to use as the current print/PDF option. You won’t even realise there’s anything special going on behind the scenes.

Given that Texpad provides a very good solution to the problem, I’m going to be leaving this second stage until much later on, and focus on other features like find & replace, spell checking, EPUB support, and better file management over the next few months.

In summary

I know all this sounds awfully complicated — and, well, it is. I understand and sympathise with those of you who are waiting for these features and I’m just as keen as you are to have them in place. Unfortunately these things take a lot of time and effort — even Microsoft, with all the resources at their disposal, are at least 18 months away from having a working release of Word on the iPad, if recent rumours are to believed. The important thing to know is that I’m very much aware of the needs of professional writers and have a solid roadmap in place for the future of UX Write.

Thoughts on the Blink/WebKit fork

It’s been a few days now since Google announced their decision to start their own fork of WebKit, called Blink. I was initially quite surprised and disappointed by this, given the duplication of effort and fragmentation this could possibly lead to. I understood the situation much better however after reading Alex Russell’s post which explains their rationale, and I feel that all the reasons he gave make sense — that is, Google has more freedom to innovate by working separately from Apple.

There’s an even more important reason though that I think this is actually a good thing — diversity. People forget the dire state the web was in back in 1999, when Netscape was on its deathbed and Internet Explorer was emerging as the winner of the “browser wars”. Developers started targeting IE only, and those using anything else were left in the cold. People who argued against this were considered by the mainstream to be on the fringes of society, and ridiculed for not simply giving in and accepting the inevitable victory of the almighty IE6. My, how times have changed.

The KHTML library (which became WebKit) was initially created around this period by Lars Knoll and other developers involved with the KDE project, with the goal of producing a modern, high-quality browser for the Linux desktop. While KDE never saw the success it deserved, WebKit went on to become one of the biggest success stories of the open source movement, after being adopted & improved first by Apple (for Safari), and then by Google (for Chrome). What started out in its first few years as an underdog has now become the market leader on mobile by an overwhelming majority.

We’re now in the ironic situation where instead of the web being at risk of becoming an IE monoculture, it is now at risk of becoming a WebKit monoculture. Both of these things are bad; it’s important that web sites continue to be developed based on standards, not on the quirks of a particular browser engine. Multiple implementations are key to this — it ensures, in the long term, that all browsers converge towards consistent behaviour, and keeps the possibility open of entirely new browser engines being created in the future.

Although Blink and WebKit are identical right now, the fact that Google is going to follow a separate development path will help ensure that as the web evolves, we’ll have an additional implementation of all new APIs and layout features. There’ll undoubtedly be fragmentation problems with new features added to standards in the short term, but it will result an a better outcome in the long term as bugs are fixed to comply with the standards, and developers are forced to create sites that work in any browser, not just those based on WebKit.

Page Layout in the Era of Electronic Publishing

The basic design of modern word processors has its roots in the WYSIWYG (“what you see is what you get”) revolution of the 1980s, which became possible with the introduction of the graphical user interface. Whereas people once had to use a text editor to enter markup by hand, and never really knew what their document was going to look like to readers until they printed it, WYSIWYG provided an accurate on-screen depiction of how the final print output would appear.

For most of the history of personal computing, documents have been written for print. Even when they were viewed on a desktop or laptop, the screen was always large enough to display either the whole page — or at least the full width of the page, with the possibility to scroll vertically. However in the last few years we’ve witnessed an incredible shift in the way people consume content — e-readers and tablets are now widely used by people for reading books, papers, and notes.

Because devices like the iPad, Kindle, and Android tablets have screens that are smaller than a typical printed page — particularly in the case of 7″ tablets — it’s necessary for software that displays documents to take a different approach to layout than what has traditionally been used. Whereas in a Microsoft Word document or a PDF file you have a fixed page layout where the placement of text on a page is predictable, e-book readers instead use a reflowable layout in which the text is adjusted to suit the screen size, orientation, and user preferences. If you’re writing an e-book, you can’t rely on the assumption that page breaks will occur in particular places, since this will be different for every reader. In other words, what you see is not what you get.

e-book layout

If you look closely at the picture above (click to see full-size), you’ll notice that the page being displayed is different on every device. My Macbook Pro, with a 24″ external monitor, has lots of screen real estate available and can thus fit a lot more text on the page than any of the other devices. The two iPads are both displaying the same page, but because the one on the right has a non-retina display, I’m using a larger font than on the retina iPad on the left, for legibility — meaning less text fits on the screen. The Android tablet (sorry Steve) has different dimensions and is in portrait mode, while the iPhone’s screen is so small that it only has room for the picture plus two lines of text.

On every device, the book has a different number of pages. And neither has the same number of pages as the print version.

Reflowable Content and Editing

The new reality of multi-format publishing we find ourselves in demands a different approach to document editing than was the norm during the print-only era of the 1980s and much of the 1990s. This has actually been a long time coming — the web ushered in the first major platform for viewing reflowable content, with most early web pages readily adapting to whatever size your browser window was. However graphic designers schooled in the print mindset soon came along and changed that, forcing every website into a fixed-width layout.

This worked fine for quite a while, as pretty much everyone’s computer screens were large enough to display these pages, but mobile browsing sucked for a very long time until Apple finally came along with the iPhone and Mobile Safari, with its zoom feature. For many websites however, this didn’t fully solve the problem, as although you could zoom in and out, you often had to repeatedly scroll left and right as you read through a paragraph, because some web designer had decided that their layout looked best at 1024×768, and forced the text to be that wide. The web design community realised this problem fairly quickly and started adapting their sites to either serve up a different layout to mobile devices, or use a reflowable layout that results in a good-looking document regardless of the screen size.

So if you’re designing a word processor in the early 2010s which has to run on the iPad, iPhone, and now the iPad mini, do you use fixed layout, or reflowable layout?

Based on what I’ve discussed above, the answer might seem pretty obvious, but it’s actually a bit more nuanced than that. Many people are used to the fixed layout of Microsoft Word and similar programs, and there’s a lot of established practice about the way in which formatting is done — such as entering in a series of blank lines to cause text to appear at the start of the next page, tabs to indent text to a specific width, placement of images relative to the top or bottom of the page, etc. These things don’t translate well into reflowable layout where the width of a page, and the location of page breaks (if they exist at all, which they don’t on the web) can differ between devices, and even on the same device if the user rotates it or changes their preferred text size.

There’s an inherent conflict between the goals of achieving full compatibility with the way in which desktop word processors are often used, and what works well on a tablet. Some apps have opted to simply copy the pure WYSIWYG model — dividing documents into fixed-size pages, always using a fixed width and providing a zoom feature so you can enlarge the text. While this makes it possible (in principle at least) to maintain the exact same formatting as you would see in Word, it causes lots of usability problems on small screens, particularly with the iPad mini and iPhone.

Trade-offs

There’s no ideal solution to this dilemma — it’s necessary to either provide a fixed layout, and try to preserve the exact placement of everything as it will appear in print on the small screen, or to use a reflowable layout, where the text and images are adapted to be readable on the small screen. Both approaches involve trade-offs, and which one is best depends very much on what the user’s primary goal is — layout or writing.

In designing UX Write, I decided to go with the reflowable option, because I think that of the two, it provides the best user experience on a small screen. This is also based on the assumption that the primary interest of people who use the app is their content, rather than how it looks. Of course this assumption doesn’t hold for everybody — depending on your needs, you may need finer control over layout and want to see an exact print-like representation of your document during editing. However UX Write does provide a print preview option (it’s called “Generate PDF” — they’re one and the same), so it is still possible to get this view, just not in real time.

As with many design decisions that have to be made with an app like this, things like layout approaches and file format support involve trade-offs. Different developers will make different choices on these issues based on the sort use cases they’re targeting with their app, and at the end of the day from a user’s perspective it’s necessary to choose the right tool for the job. In the case of UX Write, my goal has been to cater for multi-format publishing, where the separation between content and presentation is a necessary aspect, and to provide the best possible user experience for writing on mobile devices.

Update on Microsoft Word Support, Part 3

Yes, more delays.

Rather than another long-winded post, I figured that this time I’d just give an example of how HTML approaches things compared to Word. Hopefully this will illustrate why I’m such a strong proponent of the former.

Specifying an image in HTML

<img src="filename.png" width="66%">

Specifying an image in docx (method 1)

<w:drawing>
  <wp:inline>
    <wp:extent cx="5270500" cy="3513667"/>
    <wp:docPr id="1" name="Picture 1"/>
    <wp:cNvGraphicFramePr>
      <a:graphicFrameLocks noChangeAspect="1"/>
    </wp:cNvGraphicFramePr>
    <a:graphic>
      <a:graphicData uri="http://schemas.openxmlformats.org/drawingml/2006/picture">
        <dpct:pic>
          <dpct:nvPicPr>
            <dpct:cNvPr id="0" name="image"/>
            <dpct:cNvPicPr/>
          </dpct:nvPicPr>
          <dpct:blipFill>
            <a:blip r:embed="rId1"/>
            <a:stretch>
              <a:fillRect/>
            </a:stretch>
          </dpct:blipFill>
          <dpct:spPr>
            <a:xfrm>
              <a:off x="0" y="0"/>
              <a:ext cx="5270500" cy="3513667"/>
            </a:xfrm>
            <a:prstGeom prst="rect"/>
          </dpct:spPr>
        </dpct:pic>
      </a:graphicData>
    </a:graphic>
  </wp:inline>
</w:drawing>

Specifying an image in docx (method 2)

<w:pict>
  <v:shapetype id="_x0000_t75" coordsize="21600,21600" o:spt="75" o:preferrelative="t" path="m@4@5l@4@11@9@11@9@5xe" filled="f" stroked="f">
    <v:stroke joinstyle="miter"/>
    <v:formulas>
      <v:f eqn="if lineDrawn pixelLineWidth 0"/>
      <v:f eqn="sum @0 1 0"/>
      <v:f eqn="sum 0 0 @1"/>
      <v:f eqn="prod @2 1 2"/>
      <v:f eqn="prod @3 21600 pixelWidth"/>
      <v:f eqn="prod @3 21600 pixelHeight"/>
      <v:f eqn="sum @0 0 1"/>
      <v:f eqn="prod @6 1 2"/>
      <v:f eqn="prod @7 21600 pixelWidth"/>
      <v:f eqn="sum @8 21600 0"/>
      <v:f eqn="prod @7 21600 pixelHeight"/>
      <v:f eqn="sum @10 21600 0"/>
    </v:formulas>
    <v:path o:extrusionok="f" gradientshapeok="t" o:connecttype="rect"/>
    <o:lock v:ext="edit" aspectratio="t"/>
  </v:shapetype>
  <v:shape id="_x0000_i1025" style="width:96pt;height:64pt" type="#_x0000_t75">
    <v:imagedata r:id="rId4" o:title="min"/>
  </v:shape>
</w:pict>

A Tale of Two Standards

TL;DR: UX Write 1.1 will support both .docx and .odt files. You’ll be able to  edit documents created in Microsoft Word or OpenOffice. (Clarification: .odt support has now been postponed till a later release due to the amount of time it’s taken to implement  .docx)

Now for the full story:

One of the most important things to consider when choosing a word processor is the ability for it to work with documents in a format that is compatible with other programs. There’s a lot of reasons for this:

  • You want other people, who may not have the same word processor as you, to be able to read and edit documents you create
  • You may want to work on your document on different platforms, such as your iPad and Windows PC
  • You probably want to ensure that anything important you write today will still be readable far into the future, even after today’s software empires have faded into history

Historically, most word processors used their own proprietary format, which only they could read and write. If you wanted to share documents with other people, they had to be using the same piece of software. And if you later wanted to change to a different word processor, you couldn’t use it to work with your existing documents, unless it included an import filter. Moving from AppleWriter to WordStar to WordPerfect to Microsoft Word was a pain, because each time, you’d have to start using a different file format. You’d also have to either convert all your old documents — or, more commonly, just leave them as-is, hoping that each new word processor would provide import filters for all file formats that had ever existed previously.

A friend of mine recently told me a story about attempting to recover a copy of her honours thesis that she had written in the early 90s using a program called WriteNow, running under NeXTStep. The application was developed entirely in 68k assembly, so even though she had an Intel copy of NeXTStep that could run under VMWare, it wouldn’t work with WriteNow. As it turns out, my friend is probably the only person in my city who owns a still-working NeXTStation (I got to see it running once — an experience I considered as fascinating as seeing a fully restored steam locomotive in operation). She was able to fire up the 20 year-old machine, open the .wn document, and export it to an RTF file, which could then be read on her Macbook Pro — though none of the formatting information survived the transition.

Even if you stick with the same piece of software, over a long enough period of time, the file formats can change. Throughout its history, Microsoft Word has had a total of five different native file formats (with a sixth on its way). Each time there’s a new release of Word in which the file format changes, there’s a period of several years during which people run into problems when they try to send documents to each other, because the sender has upgraded to a new version but the receiver hasn’t.

Sometimes this can even occur with the latest release of the same program on two different platforms. For example, Pages for the iPad stores its documents in a completely different file format to Pages for the Mac, and a behind-the-scenes conversion takes place whenever you exchange documents between the two. Apple have managed to mostly paper over this with iCloud in Mountain Lion, but on a Windows or Linux machine the only way to access your documents is to manually convert each of them one-by-one using either the iCloud.com web interface, or Pages on the iPad itself.

It’s 2012. We shouldn’t have to waste time messing around with stuff like this any more.

Enter open standards

In the early 2000s, a bunch of industry experts got together in an effort to solve this problem once and for all. The idea: define a vendor-neutral format for word processing documents, spreadsheets, and presentations — and make this format open and available for any software developer to implement. The result of this effort was Open Document Format (ODF), which has been ratified as an international standard by the ISO, and is supported by a wide range of office suites — including Microsoft Office, OpenOffice, LibreOffice, Calligra, and Google Docs.

ODF has been widely adopted in the government sector, where there is particular importance placed on storing data in a format suitable for long-term archiving, and avoiding dependence on a single vendor. Using a proprietary format risks the possibility that 30 years from now, documents that you create today won’t be readable anymore, because none of us have any idea what kind of hardware or software we’ll be using then. By using a publicly available, well-documented file format, programmers in the future can easily develop software to read documents in this format — something that is not at all easy to do with proprietary binary formats.

The only reason you’re able to browse the web and receive email on your iPhone is because the Internet is built on open standards. If Tim Berners Lee, who invented the world wide web (also on a NeXTStation), had used a proprietary, undocumented binary file format that could only be read by a program written in 68k assembly for NeXTStep — well, let’s just say that everyone would be spending an awful lot more time outside, because there would be no Facebook or Reddit or even Google.

“The nice thing about standards is that you have so many to choose from.”

– Andrew S. Tanenbaum

Just as with railway gauges, electrical outlets, and television signals, some people felt that one office document standard wasn’t enough, and what the world really needed was a second one. As the development of ODF progressed, Microsoft decided to create their own competing standard – Office Open XML (OOXML) – which served basically the same purpose as ODF but was closely based on the existing file formats already used by Microsoft Office, and thus easier for them to implement.

Like ODF, OOXML documents are zip files containing a collection of XML files and other content such as images. The two standards are quite similar at a conceptual level, though a lot of the details differ, and developing a piece of software that supports both involves significantly more work than just one.

Microsoft submitted OOXML to the ECMA, and subsequently the ISO, to develop it into an international standard. To their credit, this was a major step forward from their earlier efforts to prevent competitors from being able to work with their file formats, and the use of XML made the format immensely easier to deal with in comparison to the binary .doc, .xls, and .ppt formats used previously. However, the submission and process surrounding it met with a great deal of criticism from many on the standards committee and the industry in general, and was initially rejected. Only after the specification was significantly modified to remove the dependencies on legacy and poorly-defined features (such as the autoSpaceLikeWord95 formatting option), was it finally accepted.

The result of this however was not just one standard, but two — “OOXML Strict” and “OOXML Transitional”. The strict version is what finally convinced a sufficient number of committee members to vote for its acceptance, while the transitional version (essentially the original submission that was rejected) got tacked onto the end on the condition that it would only be used for representing documents converted from older formats, not for newly-created documents.

Currently-shipping versions of Microsoft Office only fully support the transitional version of the standard, not the strict version. Office 2010 can read strict documents, but not write them. The upcoming Office 2013 finally adds the ability to both read and write strict documents.

What about HTML — you’re using that already, right?

Yes.

UX Write currently, and always will, use HTML as its native file format. The main reason for this is that it uses WebKit as its layout engine. Writing a layout engine like this is an insanely huge task, and WebKit is an extremely mature engine that been continuously developed for more than twelve years. I’m not sure how many people have been involved in that time, but I would estimate it’s probably had between 100 and 200 man years put into it. Without WebKit, it would not have been feasible for me to develop a program with the functionality of UX Write in one year by myself. In fact, most of the credit for UX Write really belongs to the WebKit developers, since writing the layout engine is most definitely the hardest part of building a word processor.

HTML has two other significant benefits:

  • Its syntax is really simple. You can edit HTML files in a text editor, and it’s very easy to learn. Compared to ODF and OOXML, which both have very complex XML structures, HTML files are small and easy to work directly with by hand.
  • It’s the “lingua franca” of the web. Every web page you’ve ever visited is in HTML format (except for a few built in the recently-deceased and little-mourned Flash), and if you’re publishing online there is no conversion step necessary if you’ve originally created your document as a HTML file. The EPUB standard for e-books is also based on HTML, so it’s ideal for publishing on e-readers as well.

Despite these benefits, HTML is rarely seen as a “word processing” file format — and for good reason. HTML lacks many of the features you typically need for word processing tasks, like headers, footers, footnotes, citations, automatic numbering, and automatically generated tables of contents. All of these can be “faked” using manual editing or javascript (which is what UX Write does in the last two cases, and will do for others in the future), but there’s no way to represent these features in a way that will be recognised by other HTML editors as anything other than regular text. So if you need these features, you’re better off using ODF or OOXML.

Choosing sides — or not

From the above description, you’ve probably got a pretty clear picture of where I stand on file formats. However, let me address one remaining factor: pragmatism.

The reality is that despite the best efforts of many in the industry to promote ODF as “the” standard for office documents, OOXML is by far the most widely used of the two. Even though Microsoft have fully supported ODF in the Windows versions of MS Word since Office 2007 SP2 (though sadly not on the Mac), the default save format is .docx, so that’s what almost everyone saves in (and therefore expects to be able to access on their iPad). It’s been clear to me from the beginning that developing a word processor that can’t open .docx files is a pretty good way to ensure failure, so including this support has always been part of my plan. This was reinforced when I initially released the app and sent a pitch to Walt Mossberg – one of the tech industry’s most respected journalists – and received a very brief reply in which he cited the lack of Word support as a “very, very serious downside”.

Also, in looking into the technical details of both file formats, my opinion (so far) is that OOXML isn’t actually that bad. Sure it has its flaws, and there are some bad design decisions here and there, but both ODF and HTML have their share too. I estimate that the amount of work required to support OOXML is about the same as for ODF, and while there’s more complexity than strictly necessary, it actually has a pretty sensible design (note: I’m referring only to the word processing portion of the standard; spreadsheets are another story).

One clarification I should make is which version of OOXML I’ll be supporting:

“Anyone who claims that their product supports `OOXML’ in an unqualified sense, without stating which conformance target or conformance classes they are supporting, is not stating anything of substance. It is like trying to buy an electrical plug adapter by just saying `I need electricity’”.

Rob Weir

UX Write will only support the transitional version of .docx. There is zero point in using the strict version, because the only product that supports it is Office 2013 (which isn’t even out yet), and due to the several-year lag times involved with people upgrading to new versions of Office, I anticipate that transitional will remain in use for quite a long time. Furthermore, Office 2013 saves as transitional by default (at least in the current preview version), so that’s what almost everyone will use. And since OOXML Strict is a different file format to OOXML Transitional, if you are going to switch formats, you might as well go to ODF, which has much broader support.

So if .docx (transitional) has become the de-facto standard, and is technically relatively ok, why not just support that, and forget about ODF? I’ve been given strong opinions on both sides of this question, but I decided a while back that supporting ODF made sense, for several reasons:

  • First and foremost, everything I’ve said above about open standards. OOXML is “open” on paper — it has been formally certified as an ISO standard — but if you read into the politics behind its development you’ll find that the process fell far short of the openness and level of cooperation typically found in ISO standardisation efforts.
  • ODF is supported by a wide range of applications, and used by a lot of people. Many state and national governments have adopted the format, and OpenOffice has reportedly had over 100 million downloads. That’s a lot of potential customers for UX Write, and I don’t want to ignore that part of the market.
  • Due to the technical similarities between the two, I’m able to use the same implementation techniques for both formats. Doing both formats instead of one is maybe 30-50% extra work, not 100%.

So I’ve said my bit about open standards, but from here on I’m mostly going to be focusing on the technical aspects of the formats and making sure they’re both supported equally well in UX Write. Which of these two formats you prefer is a decision for you to make, and whatever you choose, UX Write will work fine with it. As I continue to add features like footnotes, bibliographic citations, and equation editing, I’ll be doing them in lock-step with both formats, so both will work just as well.

Work on both formats is progressing well, and all the foundations are in place, along with basic editing capabilities. It’s going to be a while yet before I have a release out which supports these two formats, but I anticipate having a version available to beta testers within the next few weeks. When I get time (which is not very often, due to how busy I am with development), I plan to post some more details on what I’ve learnt from implementing the two formats – in particular comparing how each of them represents various features.

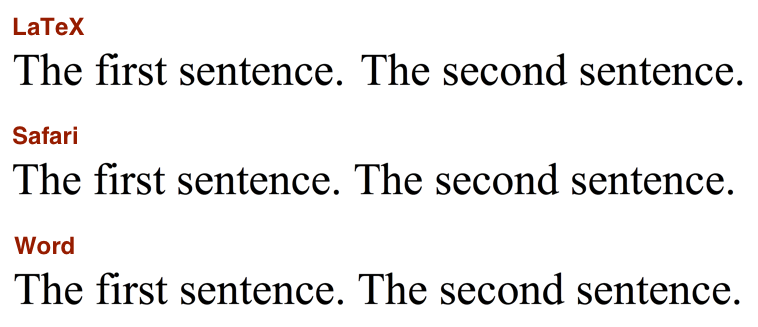
LaTeX users, I haven’t forgotten about you

This post is already long enough, but I want to make it clear that I still plan on adding LaTeX support. As someone who’s spent many years in an academic research environment (in the School of Computer Science at Adelaide University), I’m well aware that LaTeX is the de-facto standard in many scientific and engineering fields. I wrote my honours and PhD theses, as well as all of my research papers and course notes, in LyX (a graphical front-end to LaTeX). If it wasn’t for the fact I’m developing UX Write, I’d likely never consider using anything else.

However, I consider this a less-urgent task than ODF/OOXML, particularly since UX Write is based on a semi-WYSIWYG model, and many LaTeX users prefer to write code by hand. After the above two formats are done I’ll be working on other features like find & replace, spell checking, and citations, but LaTeX is still very much on the roadmap. In the meantime, you may be interested in checking out Texpad, the developers of which have recently gotten the first successful port of LaTeX to iOS working.

For the three of you who are still reading this

One of my favourites from XKCD:

XKCD: Standards