It’s been a long time since I posted about this so I wanted to give a brief update on where things are at regarding file format support and the upcoming 1.1.0 release of UX Write. I posted back in October that I had decided to support both .docx (Microsoft Word) and .odt (OpenOffice) formats, in addition to the current native HTML format.
As it turns out, the amount of work involved in getting .docx support operational has been much greater than I expected. I’ve been focusing primarily on that over the last couple of months (as it’s the most popular of the two), and have decided that I will release 1.1.0 with .docx support only, and add ODF at a later point in time. While I could delay the release further until I have both file formats working, I don’t think there’s any benefit in doing so. There’s a lot of people waiting on .docx support, so I want to make this available both for the benefit of existing users and because it’s important for the commercial success of the app.
What Does Microsoft Word Support Mean?
It’s tempting to pose the question “Is this app compatible with Microsoft Word?”. It would be nice to give a straight “yes” or “no” answer, but unfortunately the situation is more complicated than that. Microsoft Word has literally hundreds of features, and no other app has or will ever support all of them. All other word processors which work with one or more of Word’s file formats support only a subset of these features. This is typically ok however, as most people only use a small, common set of features rather than every single one.
I’m focusing on supporting only the most important and widely-used features, from the viewpoint of professional, academic, and technical writing — for the most part matching the set of document structure features common in LaTeX (e.g. sections, figures, tables, references), as well as almost all the formatting properties that can be expressed in HTML and CSS. Since all the other word processors for the iPad address the former either very poorly or not at all, UX Write 1.1.0 will likely have the most feature-rich support for .docx on the platform upon its release.
Note that there is a big difference between .docx and .doc files – in fact they are two entirely separate file formats. UX Write will only support .docx, which is a modern, well-documented, XML-based file format that is (relatively) easy to read and write. The older .doc format is a much more complicated binary file format that would be a great deal more difficult to support. I’m aware that some people still use it, and while I could support it with perhaps another six months of work, I feel that time is better spent on improving other aspects of the app. You can easily convert from .doc to .docx (and back again) using any recent version of Word.
Maintaining Document Integrity
The normal way for a word processor to support third-party file formats is to provide import and export facilities. Import converts the document from the third-party format to the program’s native format, and export converts back the other way.
The problem is that this is a lossy process – it is rare for the native format to support a superset of the third-party format’s features, and converting between the two inevitably means you’re going to lose some structural or formatting information along the way. If you look around the support forums for Pages and similar apps you will find many instances of people complaining they’ve lost formatting or other information like footnotes when going back and forth between their iPad and Mac or PC.
UX Write instead uses a technique called bidirectional transformation to interface with third-party file formats such as .docx. Although its native format is HTML, which doesn’t support all the features of Word (such as embedded spreadsheets), and you won’t be able to see or edit these unsupported features, they won’t be lost when you save your document. This is because instead of the saving process completely replacing the original document with a new one converted from HTML, it takes the original document, works out what has changed in the HTML version, and makes the corresponding changes to the original document. This has the following implication:
Any formatting or other features of .docx that UX Write doesn’t support will be kept in-tact on save. You will be able to safely move back and forth between UX Write on your iPad and Microsoft Word on your PC or Mac without losing data.
To understand why this is, let’s have a look at how the traditional import/export process works:
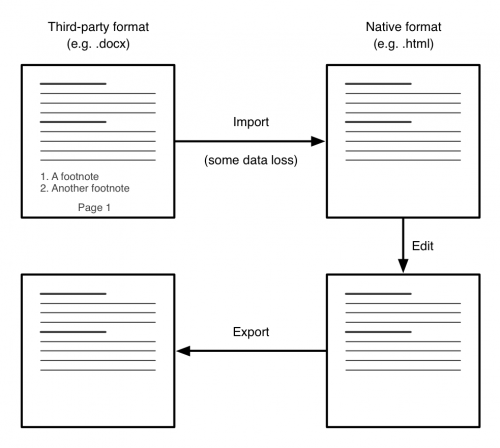
Figure 1: Import/export
Figure 1 illustrates an example of a document containing headings, text, footnotes, and page numbers. When the document is imported, the headings and text (which HTML supports) are maintained, but the footnotes and page numbers (which HTML doesn’t support) are lost. The user makes some changes to the document and then saves it. During save, the export process deletes the original document and replaces it with a new version re-created entirely from the HTML version. Because the latter did not contain the footnotes or page numbers, these are also absent from the saved version.

Figure 2: Bidirectional transformation
Figure 2 illustrates the bidirectional transformation process used in UX Write. When the document is first opened, it is converted from .docx to HTML. This is the same process as before, and maintains the headings and text, while losing the footnotes and page numbers (HTML has no notion of separate pages in a document). After the user has edited the file, they save it.
Now here’s where the difference comes in: Instead of completely re-creating the document, bidirectional transformation takes both the original .docx document and the modified HTML document as input, and updates the original based on the changes that have been made to the HTML version. Any changes, additions, or deletions to the headings or text will be applied, but the footnotes and page numbers will be left completely untouched. The user syncs their document with their Mac or PC and opens it in Microsoft Word, and is happy to see that everything is still in place.
Incremental Feature Support
Now that you understand how bidirectional transformation works (trust me, this is a very much simplified explanation of events!), you can see how it is possible for UX Write to support only some features of Microsoft Word, without losing all the other information in your document. In particular, it permits features to be incrementally supported. For example, the first release in the 1.1.x series won’t support footnotes, but this is something I’ll be working on for future versions. In the meantime, while you won’t be able to view or edit footnotes, they’ll at least still be there when take your document back to Microsoft Word on your PC or Mac.
I’ll be putting up another post soon which details the features that are currently supported in the development version and will be available when 1.1.0 is released, as well as others that will be added in the future.