Footnotes, Headers, and Footers

Among the features I’ve had the most requests for are the ability to add footnotes to documents, as well as custom page headers and footers. These are standard features of print-oriented word processors and many people naturally expect to find them in UX Write. So I thought I’d give an outline of my plans for supporting these. There’s some rather tricky issues involved due to the web-oriented nature of the app, but fortunately these are solvable.

WebKit for editing

UX Write actually doesn’t do any layout itself; it is entirely dependent on the WebKit rendering engine, as used in Safari and Chrome, for displaying all content. WebKit is based on HTML and CSS, the document structure and formatting languages of the web, which work somewhat differently to the file formats used by print-oriented word processors such as Microsoft Word and OpenOffice Writer. The differences — in particular, HTML’s continuous, non-paginated nature — have important implications for the feature set that is possible to support in UX Write.

Writing a (sufficiently capable) custom layout engine is a task that takes a sizeable team of people and many years of effort, which simply wasn’t a viable option for this app. Relying on WebKit makes it possible to invest all development resources entirely on editing capabilities, rather than all of the logic to calculate where each piece of text goes and how it’s formatted. This is why UX Write possesses so many more features than its competitors — all the hard work of layout is already taken care of. WebKit is also built in to iOS, which makes it a very convenient choice for use in an iPhone/iPad word processor.

By using WebKit, UX Write inherits both the capabilities and limitations of HTML. Although HTML has a lot of great features — styles, tables, images, lists, hyperlinks, and a ton of formatting options — it’s not particularly good at paginated, print-based output. On the web, there’s no notion of a document being divided into a series of (virtual or real) sheets of paper like in a traditional pure-WYSIWYG word processor. I’ve previously discussed why relying on explicit pagination during editing doesn’t make sense in the context of writing for e-books or the web, but it is relevant for documents that are ultimately destined for print output only. Unfortunately, among the features HTML lacks are — you guessed it — footnotes, headers, and footers.

Currently, UX Write uses WebKit for both editing and print/PDF output — but there’s some changes on the way for the latter.

LaTeX for printing

WebKit isn’t the only layout engine out there of course. Another popular one is Donald Knuth’s famous TeX typesetting engine, which was designed in the early 1980s for high-quality presentation of scientific and mathematical publications. It was later used by Leslie Lamport as the basis for LaTeX, a high-level set of macros for structuring documents that are ultimately typeset by TeX to produce printed output. I’ve used LaTeX for producing all of my academic publications (though doing my writing in LyX, a graphical front-end), and it’s pretty much the de-facto standard for academic publishing in computer science, mathematics, physics, and other scientific fields. After being around for more than 25 years, LaTeX is still regarded as one of the best quality typesetting engines out there.

LaTeX provides excellent support for print-oriented features such as footnotes, headers, and footers, plus many others such as page-number references and embedding of hyperlinks and outline navigation elements in PDF files. It’s a much better option than WebKit for generating print output, and making use of it in UX Write will make it possible to provide these features.

There’s one major problem with LaTeX however — it is only able to run in batch mode, and cannot provide real-time updates to the typeset document during editing, as WebKit can. What batch mode means is that a document is supplied to LaTeX, it goes away and does its thing, and then a few seconds later you get back a PDF file with the output. This means that it can only realistically be used for printing or exporting PDF files, and leaves us with WebKit as the only viable option for actual editing.

It’s always been a goal of mine to have built-in LaTeX support in UX Write. My hopes were initially dashed after I read about the immense difficulties the developers of Texpad had encountered while attempting a port to iOS due to the complexity of the codebase, however they eventually achieved success with a much simpler LaTeX distribution than that which is typically used on desktop systems. Upon learning of this I realised two things — that it is viable to do, and that I should work with them.

So LaTeX provides the solution to the problem of producing high-quality print output with all the layout features typically expected. However because getting this integration working is quite an involved task, I’m going to be doing it in two separate stages:

Stage 1 (soon): External typesetting

Initially, UX Write will provide an option to export the current document as a .tex file, which can either be converted to a PDF directly on your iPad or iPhone using Texpad, or on your desktop system using an existing LaTeX distribution such as TeX Live.

Installing and using LaTeX on a desktop system requires a fair bit of technical proficiency, and is something I only recommend for advanced users who are already familiar with the process. Texpad is a much easier solution, as it’s just as easy to install as any other iOS app, and will integrate seamlessly with UX Write. I’ve been working with the Texpad developers over the past couple of months on getting this integration working, and we’re getting fairly close to having it available.

Stage 2 (later): Built-in typesetting

Eventually, UX Write will contain a built-in version of LaTeX that it will run directly when you print or export to PDF. Everything will be done within the app, without requiring any third-party software, and it will be just as seamless and easy to use as the current print/PDF option. You won’t even realise there’s anything special going on behind the scenes.

Given that Texpad provides a very good solution to the problem, I’m going to be leaving this second stage until much later on, and focus on other features like find & replace, spell checking, EPUB support, and better file management over the next few months.

In summary

I know all this sounds awfully complicated — and, well, it is. I understand and sympathise with those of you who are waiting for these features and I’m just as keen as you are to have them in place. Unfortunately these things take a lot of time and effort — even Microsoft, with all the resources at their disposal, are at least 18 months away from having a working release of Word on the iPad, if recent rumours are to believed. The important thing to know is that I’m very much aware of the needs of professional writers and have a solid roadmap in place for the future of UX Write.

This Month’s “Office for iPad delayed” Rumour

Every now and then a “leak” comes out about a purported Microsoft roadmap saying that they’re planning a version of Office for iOS and Android, but it’s been delayed for one reason or another. This month is no exception, with a release slated for the second half of 2014 [1].

I honestly don’t know if these rumours are actually true, or just a clever PR stunt on behalf of Microsoft to discourage others from trying to produce competing apps. What I am certain of however is that the task of porting the huge legacy codebase of Office to the iPad must be absolutely daunting. Office is an immensely complicated piece of software, and if they are working on an iOS version, I’m not surprised it’s taking a while.

The best comment I’ve seen so far on the issue was one made in response to the Macrumors article, by a user named (well, I guess I have to say it if I want to quote them) nuckinfutz:

“Office is becoming irrelevant. The iPad has flourished despite not having MS Office and that’s an encouraging sign. The days of Microsoft software being a “must have” for success are over.

Today people just care about having some sort of import/export capability and are comfortable with non Microsoft solutions.”

I think there’s a great deal of truth in this. There’s a school of thought that considers MS Office as the be all and end all of productivity apps, and that every other piece of software must be measured by how closely it matches it. I disagree with that notion, and as nuckinfutz pointed out the most important thing is not whether you have MS Office per se, but whether you can actually get your work done and access your documents. UX Write fulfils this criteria.

In fact I’m of the view that MS Word is a really bad starting point if you’re trying to create a tablet word processor. We’ve seen what they’ve managed to come up with on the tablet form factor so far, and it leaves a lot to be desired, to put it mildly. UX Write has been designed from the ground up with mobile devices in mind – catering for the small screen, adapting cursor movement and selection for the on-screen keyboard, and making it dramatically more intuitive to achieve consistent formatting throughout your document.

This stuff is much easier to do if you’re starting from scratch. Sure, it takes a long time to get all the features people want and expect in, but that’s probably no less a task than porting a large codebase with lots of dependencies on Windows.

So why wait for Microsoft? Give UX Write a try today (which you can now do for free in your browser), and check it out in the app store if what you’re looking for is a high-end word processor that works well with existing docx files created in Word.

[1] Side note to Americans: “fall” (aka Autumn) occurs at a completely different time of year in Australia and other countries in the southern hemisphere. Months or quarters are less ambiguous 😉

Page Layout in the Era of Electronic Publishing

The basic design of modern word processors has its roots in the WYSIWYG (“what you see is what you get”) revolution of the 1980s, which became possible with the introduction of the graphical user interface. Whereas people once had to use a text editor to enter markup by hand, and never really knew what their document was going to look like to readers until they printed it, WYSIWYG provided an accurate on-screen depiction of how the final print output would appear.

For most of the history of personal computing, documents have been written for print. Even when they were viewed on a desktop or laptop, the screen was always large enough to display either the whole page — or at least the full width of the page, with the possibility to scroll vertically. However in the last few years we’ve witnessed an incredible shift in the way people consume content — e-readers and tablets are now widely used by people for reading books, papers, and notes.

Because devices like the iPad, Kindle, and Android tablets have screens that are smaller than a typical printed page — particularly in the case of 7″ tablets — it’s necessary for software that displays documents to take a different approach to layout than what has traditionally been used. Whereas in a Microsoft Word document or a PDF file you have a fixed page layout where the placement of text on a page is predictable, e-book readers instead use a reflowable layout in which the text is adjusted to suit the screen size, orientation, and user preferences. If you’re writing an e-book, you can’t rely on the assumption that page breaks will occur in particular places, since this will be different for every reader. In other words, what you see is not what you get.

e-book layout

If you look closely at the picture above (click to see full-size), you’ll notice that the page being displayed is different on every device. My Macbook Pro, with a 24″ external monitor, has lots of screen real estate available and can thus fit a lot more text on the page than any of the other devices. The two iPads are both displaying the same page, but because the one on the right has a non-retina display, I’m using a larger font than on the retina iPad on the left, for legibility — meaning less text fits on the screen. The Android tablet (sorry Steve) has different dimensions and is in portrait mode, while the iPhone’s screen is so small that it only has room for the picture plus two lines of text.

On every device, the book has a different number of pages. And neither has the same number of pages as the print version.

Reflowable Content and Editing

The new reality of multi-format publishing we find ourselves in demands a different approach to document editing than was the norm during the print-only era of the 1980s and much of the 1990s. This has actually been a long time coming — the web ushered in the first major platform for viewing reflowable content, with most early web pages readily adapting to whatever size your browser window was. However graphic designers schooled in the print mindset soon came along and changed that, forcing every website into a fixed-width layout.

This worked fine for quite a while, as pretty much everyone’s computer screens were large enough to display these pages, but mobile browsing sucked for a very long time until Apple finally came along with the iPhone and Mobile Safari, with its zoom feature. For many websites however, this didn’t fully solve the problem, as although you could zoom in and out, you often had to repeatedly scroll left and right as you read through a paragraph, because some web designer had decided that their layout looked best at 1024×768, and forced the text to be that wide. The web design community realised this problem fairly quickly and started adapting their sites to either serve up a different layout to mobile devices, or use a reflowable layout that results in a good-looking document regardless of the screen size.

So if you’re designing a word processor in the early 2010s which has to run on the iPad, iPhone, and now the iPad mini, do you use fixed layout, or reflowable layout?

Based on what I’ve discussed above, the answer might seem pretty obvious, but it’s actually a bit more nuanced than that. Many people are used to the fixed layout of Microsoft Word and similar programs, and there’s a lot of established practice about the way in which formatting is done — such as entering in a series of blank lines to cause text to appear at the start of the next page, tabs to indent text to a specific width, placement of images relative to the top or bottom of the page, etc. These things don’t translate well into reflowable layout where the width of a page, and the location of page breaks (if they exist at all, which they don’t on the web) can differ between devices, and even on the same device if the user rotates it or changes their preferred text size.

There’s an inherent conflict between the goals of achieving full compatibility with the way in which desktop word processors are often used, and what works well on a tablet. Some apps have opted to simply copy the pure WYSIWYG model — dividing documents into fixed-size pages, always using a fixed width and providing a zoom feature so you can enlarge the text. While this makes it possible (in principle at least) to maintain the exact same formatting as you would see in Word, it causes lots of usability problems on small screens, particularly with the iPad mini and iPhone.

Trade-offs

There’s no ideal solution to this dilemma — it’s necessary to either provide a fixed layout, and try to preserve the exact placement of everything as it will appear in print on the small screen, or to use a reflowable layout, where the text and images are adapted to be readable on the small screen. Both approaches involve trade-offs, and which one is best depends very much on what the user’s primary goal is — layout or writing.

In designing UX Write, I decided to go with the reflowable option, because I think that of the two, it provides the best user experience on a small screen. This is also based on the assumption that the primary interest of people who use the app is their content, rather than how it looks. Of course this assumption doesn’t hold for everybody — depending on your needs, you may need finer control over layout and want to see an exact print-like representation of your document during editing. However UX Write does provide a print preview option (it’s called “Generate PDF” — they’re one and the same), so it is still possible to get this view, just not in real time.

As with many design decisions that have to be made with an app like this, things like layout approaches and file format support involve trade-offs. Different developers will make different choices on these issues based on the sort use cases they’re targeting with their app, and at the end of the day from a user’s perspective it’s necessary to choose the right tool for the job. In the case of UX Write, my goal has been to cater for multi-format publishing, where the separation between content and presentation is a necessary aspect, and to provide the best possible user experience for writing on mobile devices.

UX Write 1.1.0, now with Microsoft Word support

At long last, the first release of UX Write to support Microsoft Word’s .docx file format is now available on the app store. This has been a very complex undertaking that’s involved many months of work, and represents a significant step forward for the app in terms of making it useful to a much wider audience. Now you can seamlessly work on the same document using UX Write on your iPad or iPhone and Microsoft Word on your PC or Mac.

To the best of my knowledge, UX Write now provides the highest level of compatibility with .docx files out of any word processor available for the iPad. Virtually all of the basic text and formatting properties are supported, along with essential features like figures, tables, styles, numbered headings and captions, cross-references, and automatically-generated tables of contents. While these features were already supported for HTML documents in version 1.0, you can now use all the same features with Word documents as well.

As with previous versions of UX Write, all documents are displayed using a continuous, reflowable layout rather than the fixed-size page layout that Word uses. Reflowable layout is a much more suitable approach for mobile devices, which, particularly in the case of the iPhone and iPad mini, do not have screens large enough to comfortably display a full-sized A4 page without some combination of squinting or excessive horizontal scrolling. The reflowable layout model used by UX Write is the same as that of e-book readers such as Kindle and iBooks, and just like in these apps, UX Write lets you adjust the text size to whatever you find the most comfortable for reading. You can still see what the printed version of your document will look like by using the “Generate PDF” option.

HTML remains the default file format, and UX Write continues to rely on the WebKit layout engine (the same as used by Safari and Chrome) for displaying documents. When you open a .docx file, UX Write temporarily converts it to HTML for editing, and then converts it back to .docx upon save. However, it does this in an intelligent manner which preserves any formatting properties or other elements in the document (such as page breaks and tabs) that can’t be represented in HTML, as I described in an earlier post.

I’m still a very strong proponent of HTML as a standard document format — it’s worked pretty well for the web over the last 20 years, and is fully supported by every modern computing platform and web browser. Its simple, text-based syntax makes it easy to edit by hand (as millions of web developers do every day), and plays well with version control systems such as Subversion and Git. HTML is also the basis for the EPUB standard for e-book publishing, which I’ll be adding support for in an upcoming version.

One caveat I should mention is that I won’t be supporting the legacy .doc file format used by older versions of Microsoft Word prior to 2007. While I’m aware that it’s still used by some people, it’s a hideously complex binary format that wasn’t designed with interoperability in mind, and I estimate it would take at least another six months to support (and probably a great deal longer to do so properly). When faced with the choice between doing that, and instead investing that time in arguably more important features like find & replace, spell checking, footnotes, EPUB export etc., I decided to go with the latter. If you have a .doc file you wish to edit in UX Write, you can easily convert it to .docx using any recent version of Word (2007 or later).

Although this release has had extensive beta testing, it’s inevitable there’ll still be a few issues remaining, and I’ll be releasing regular updates (probably every couple of weeks or so) during the 1.1.x series. There’s a bunch of other features (such as footnotes, citations, and improved PDF output) I’ve got planned for upcoming major versions which I’ll be working on in parallel, but bug fixes to any issues reported with the .docx support will take priority for the time being. If you do encounter any bugs in this version, don’t hesitate to contact me, and I’ll endeavor to get them fixed as quickly as possible.

Update on Microsoft Word Support, Part 2

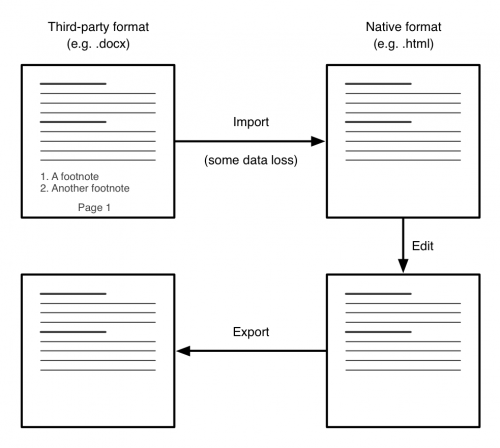
How does the saying go? Time flies when you’re either having fun, or working on software to translate between different file formats. Something like that, anyway.

Word support is taking longer than expected to get completed, so I wanted to give an update on where things are at. Given the importance of this release, and the fact that many people are now relying on UX Write for their daily work, I’m not going to hurry to push this out –  I’m going to wait until it’s truly ready and has had sufficient testing. I know a lot of people are waiting for Word compatibility to arrive, but I believe it’s better for me to wait until the update is at a sufficient level of reliability, than to release early and risk causing problems for people.

So here’s a summary of what is and isn’t in place currently:

Text and basic document structure

Plain text, obviously the simplest aspect of the file format, is fully implemented (and has been for a long time). The representation of text and basic structure in the .docx format is well-thought out:

  • A document consists of a sequence of paragraphs and tables
  • A paragraph consists of a sequence of runs, each of which contains text with different formatting properties
  • A table contains a grid of cells, each of which contains a sequence of paragraphs and (nested) tables

That’s a nice and simple structure. There’s a little more to it, but essentially this matches what HTML does. HTML actually allows a little more flexibility in the structuring of paragraph content (you can have nested runs, for things like bold text, color and font changes etc), but each HTML paragraph is easily transformed into a “flat” representation that corresponds directly with Word’s model.

Styles

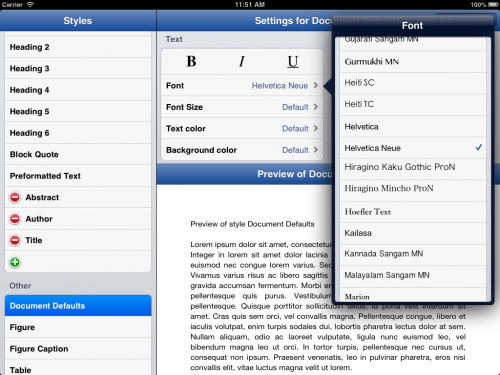
Styles are almost fully supported. Word supports three primary types of styles: Paragraph styles, Character styles, and Table styles. UX Write’s user interface currently only allows you to edit paragraph styles (this will change in a future version, but not in 1.1.0), however all character and table styles are maintained and displayed during editing.

Since the document is translated into HTML and maintained as such during editing (as described in my previous post), all formatting properties are represented using CSS, the stylesheet language used on the web. CSS supports the vast majority of formatting properties present in .docx, with a few minor exceptions such as double-strikethrough and different types of underline. In general, the way the document appears in UX Write will be the same as in Word (with the notable exception of pagination and page layout; see below), though there are a few minor quirks.

If you’re using one of the few formatting properties in your document that can’t be expressed in CSS, these will be maintained in the document, due to the bidirectional transformation technique used to save documents.

Supported formatting properties

The following properties are supported for both direct formatting and styles:

Paragraph properties

  • Borders (thickness, color, and line type), configurable for each side
  • Background color
  • Text alignment (left, center, right, and justify)
  • Left and right margins (indentation)
  • Separate indentation for the first line (both positive and negative, or “hanging” indents)
  • Top and bottom margins (spacing between paragraphs)
  • Line height (spacing between lines in a paragraph)

Text properties

  • Bold
  • Italic
  • Underline
  • Strikethrough
  • Font name
  • Font size
  • Text color
  • Background (highlight) color

Tables

Table structure (rows, columns, and merged cells) is fully supported. There’s no user interface support for adjusting column widths or merging and splitting cells yet (again, this will come later), but the table structure you see in UX Write will be the same as in Word.

One very powerful feature of .docx is the variety of table formatting options it supports – you can set properties not just for all the cells in the table, but for the first and last rows, first and last columns, even and odd rows, even and odd columns, as well as the cells in each corner of the table. Word itself contains an extensive range of pre-defined table styles with various nice appearances.

These aspects of table styles are not yet supported in UX Write, but I’ve figured out a way of representing all the various options in CSS, so it’s going to be possible to achieve this. In the future, I will be adding the ability to edit table styles within the style manager, enabling you to set all of these properties. Since they can be expressed in CSS, these options will also be available when working with regular HTML documents as well. For now however, tables are formatted using only plain, black borders.

Lists

This was a very challenging one. Word has a completely different concept of what a list actually is, compared to that used by most other formats, including HTML, ODF, and LaTeX. The translation between the two models is far from straightforward, and while I’ve been able to cater for the typical use cases, there are a few uncommon cases that can’t be expressed in HTML.

In HTML, ODF, and LaTeX, a list is an object containing a sequence of items, and each item is an object containing a sequence of paragraphs, tables, or other lists. Thus there is an explicit notion of the items being contained within a list.

Word, strictly speaking, doesn’t actually support lists. What it does support are numbered paragraphs, which are simply normal paragraphs which have an optional numbering definition associated with them. A numbering definition specifies a counter, which increments each time it is used, and a format for the number at each level of indentation (such as arabic or roman numerals, or uppercase/lowercase letters).

With a simple list that has only one paragraph per item, each paragraph is adjacent to the next, and all have the same numbering definition. This can easily be translated into a HTML list, by simply creating an item element (<li>) for each paragraph, and placing those inside a single list element (<ol> or <ul>).

With a list that contains multiple paragraphs inside an item, things start to get a bit more complicated. All paragraphs after the first in a given item have no numbering definition associated with them, so it’s impossible to tell which list item they’re associated with simply by looking at the paragraph itself. What the translation algorithm has to do is go through all the paragraphs in the document and keep track of what the most recent numbering definition it saw was. This determines which list item subsequent paragraphs are placed under.

The algorithm has to be careful when doing this however, as it needs to distinguish between a paragraph that is part of a list item, and a paragraph that comes after the list. The only way to do this is to look at the indentation level of the paragraph:

  • If the paragraph starts at the same horizontal position as the first paragraph in the list item, then it’s part of the same item.
  • If its horizontal position is to the left of the current list item, this means that it comes after the list in question.

So the translation algorithm must look at the indentation level of each paragraph to determine whether it is part of the previous list, or comes after the list. And in the case of nested items, it also has to determine which of those items it is part of.

Another complication is that because there’s no containment relationship between different items in a given list (remember, there is no explicit concept of a “list” in Word), it’s actually possible to have interleaved lists, like this:

1. First item in list A
2. Second item in list A
i. First item in list B
ii. Second item in list B
3. Third item in list A
iii. Third item in list B

It’s impossible to express this in HTML. What will happen in this situation is that the first two items in list B will be placed in a nested list inside list A, and the third item from list B will be put into a separate list that comes after A. Unfortunately this will result in the numbering starting again from i. I don’t think this is likely to be very common though, and I can’t think of a situation in which you would actually want to do something like this (though if you can think of one – let me know).

The main types of numbering formats that CSS supports (decimal, decimal-leading-zero, lower-roman, upper-roman, lower-alpha, upper-alpha) and bullet points (disc, circle, and square) are all supported, and are translated correctly in both directions between their equivalents in Word. Numbering formats involving multiple levels (e.g. 1.1, 1.2, 1.3) in the case of nested lists are not supported, though I may be able to find a way to address this in a later update.

The argument that lists should be represented in a hierarchy as opposed to a flat sequence of paragraphs may seem pedantic and obscure, but it suddenly becomes very important when you try to do outlining. Spend two minutes using OmniOutliner and you’ll very clearly see the opportunities brought about by representing things hierarchically, like the ability to expand and collapse individual items, move entire nested lists around, and so forth. I have plans to expand the outline feature in UX Write to incorporate lists, in addition to the current support for headings.

Automatic numbering

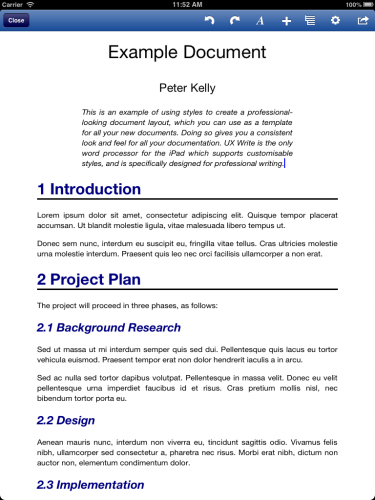
Numbered headings in Word use the same mechanism of numbering definitions as lists, except that the numbering definition to be used is specified in the heading style, rather than as a direct formatting property on the paragraph itself. The default template in Word has numbering off by default, but you can turn it on in Word by going to the style editor, then Heading 1, then Format -> Numbering, then Outline numbered, and select one of the seven different types of outlining formats. In UX Write I’ve simplified this down to a “Numbered headings: on/off” in the settings menu. I’ll add the ability to customise this later.

The style translation algorithm detects styles named “Heading1” through “Heading6” and translates them into CSS style declarations using HTML’s <h1> to <h6> elements. For each of these styles, it looks to see if there is a numbering definition set, and if so, sets the appropriate CSS properties to assign numbers to headings automatically.

Tables and figures are handled differently. Rather than using numbering definitions, Word instead uses field codes placed in the adjacent caption (if present), which increment a named counter, such as “TABLE” or “FIGURE” (though sadly this purely internal name can differ depending on the language in which the document is written – even though it’s never made visible to the user). Because the names of counters aren’t guaranteed to be the same in all documents, the translation algorithm examines what type of object is above each caption, and uses that to decide whether to number it as a table or figure. As with headings, CSS counters are used for making these visible in the document.

Cross-references

Word supports multiple types of cross-references, e.g. just referencing the section number or title, or in the case of a table or figure, including the label and number (e.g. “Table 1”), or even the entire caption (e.g. “Table 1: 2012 Revenue”). UX Write uses hyperlinks (<a> elements in HTML) to represent cross-references, and custom javascript code to generate the text of the cross-reference. I have defined custom class names for each different type of cross-reference, and  the javascript code inspects the class name of an <a> element when updating cross-references to decide what should be displayed as the reference text.

Word represents the targets of cross-references using bookmarks, in contrast to HTML, which uses id attributes on the target element. A bookmark specifies a range of text in a document, and has a name associated with it which is used in any cross-references that point to it. The difference between these and id attributes is that they can appear anywhere in the text, and even span multiple paragraphs.

In determining the id attribute to set on headings, tables, and figures, the translation algorithm searches for the closest bookmark within the object and uses its name as the id attribute. Going in the other direction, if a new heading, table, or figure has been added, it generates a new bookmark in the appropriate position.

Note that in UX Write, cross-references are updated in real-time as you modify the titles of headings, or the captions of figures and tables. They are also updated whenever the associated number changes, such as if you insert a new section above an existing one that’s a target of a reference. Thus, you don’t have to go through the manual process of doing a select all and then pressing F9 (on windows) or Cmd+Option+Shift+U (on the mac) every time you want to ensure all the cross-references and the table of contents are up to date, as you have to do in Word.

Images

Images are partially supported at the moment. Existing images in documents will display in UX Write, and you can add new images from your photo library or current directory in the same manner as you do already. I’ve still yet to implement the ability to replace an existing image with a different one, and to properly translate the size of the image.

Word has two completely different ways of representing images in a document. I actually didn’t realise this until someone sent me a document to test with that had originally been created with an older version of Word and then converted from .doc to .docx. Modern versions of word use the DrawingML language to represent images, while older versions used a separate language called VML. From what I understand, the reason for keeping VML support in .docx was to make it easier to translate from .doc files to .docx, but I’m of the view they should have gotten rid of it completely and had Word automatically translate from VML to DrawingML itself, leaving only one way of representing images. Still, for documents converted from old versions of Word, I’ll have to add support for images represented using VML as well.

One really major befit of .docx over HTML is that you can embed images directly in the document, instead of storing them as separate files. If you’ve been creating HTML documents in UX Write that contain lots of images, you’ve likely noticed your folder in the file browser fill up with lots of image files which you’d rather not see intermixed with your documents. When using .docx, this will become a thing of the past, and you’ll just see the document itself.

Hyperlinks

HTML uses a really simple model for hyperlinks – it just has an element of the form <a href=”http://www.uxproductivity.com”>UX Productivity</a>, and that’s it.

In Word, you have a hyperlink element, which references an “external resource” using a numeric identifier. The text of the hyperlink is stored in the main document, but to find out the target it’s necessary to look at a separate XML file within the word package (which is represented as a zip file containing all images and other associated files). This particular file is known as a relationships file, and contains, among other things, a mapping from the relationship identifier specified in the main part of the document to the actual target URL of the link.

The translation process resolves the external reference in this manner and generates the nice, simple HTML representation given above. Going the other way, it takes the URL, and sees if there are any existing entries in the relationships file with this same URL. If there is, it reuses this same identifier. Otherwise, it generates a new identifier, adds a relationship for that URL, and then uses that new identifier when creating the hyperlink element in the main document content.

Change tracking

This is partially supported, but only to the extent that tracked changes are preserved and displayed in the HTML file, but cannot yet be accepted or rejected. Additionally, changes you make to the document in UX Write itself are not yet recorded (this will come post-1.1.0).

Word represents tracked changes as specially marked text which is either an insertion, deletion, or a formatting change. The first two of these can be directly represented in HTML using the <ins> and <del> elements, which UX Write applies a default style to so that the content of <ins> elements are displayed in blue, and the contents of <del> elements are displayed in red strikethrough. Right now, you can see both of these in the converted document, and even edit them. It’s likely this will be how it stays for the 1.1.0 release, but the next step here is to add the ability to accept/reject changes, see who made them, record changes that are made to the text in UX Write, and show or hide the deleted changes and insertion highlights.

Word’s model of change tracking is really a poor man’s version control, and there are immensely better ways to do it. I’ll be supporting this model for compatibility purposes, but I’m firmly of the view that version control systems like Subversion and Git are really the way to go. Software developers have used these systems for a very long time; in my case, I have a subversion repository containing all the code for UX Write, and as of this evening it contains a total of 4,164 different versions of the code – each one representing a change that I have made, such as adding or tweaking a new feature, or fixing a bug. I also have comments that I’ve written attached to each version, describing what has been changed and why.

I can go back and retrieve any of those 4,164 different versions, or compare any two of them to see exactly what changes have been made. If I had other people working on the project with me, I would also be able to use this to coordinate with them so we have an “authoritative” version of the code, and have multiple people working on the same piece of code with the ability to merge in their changes. This goes far beyond what Word offers and I plan to explore options to integrate this level of flexibility into future versions of UX Write – though this is an issue I’ll get to much later.

Pagination and page layout

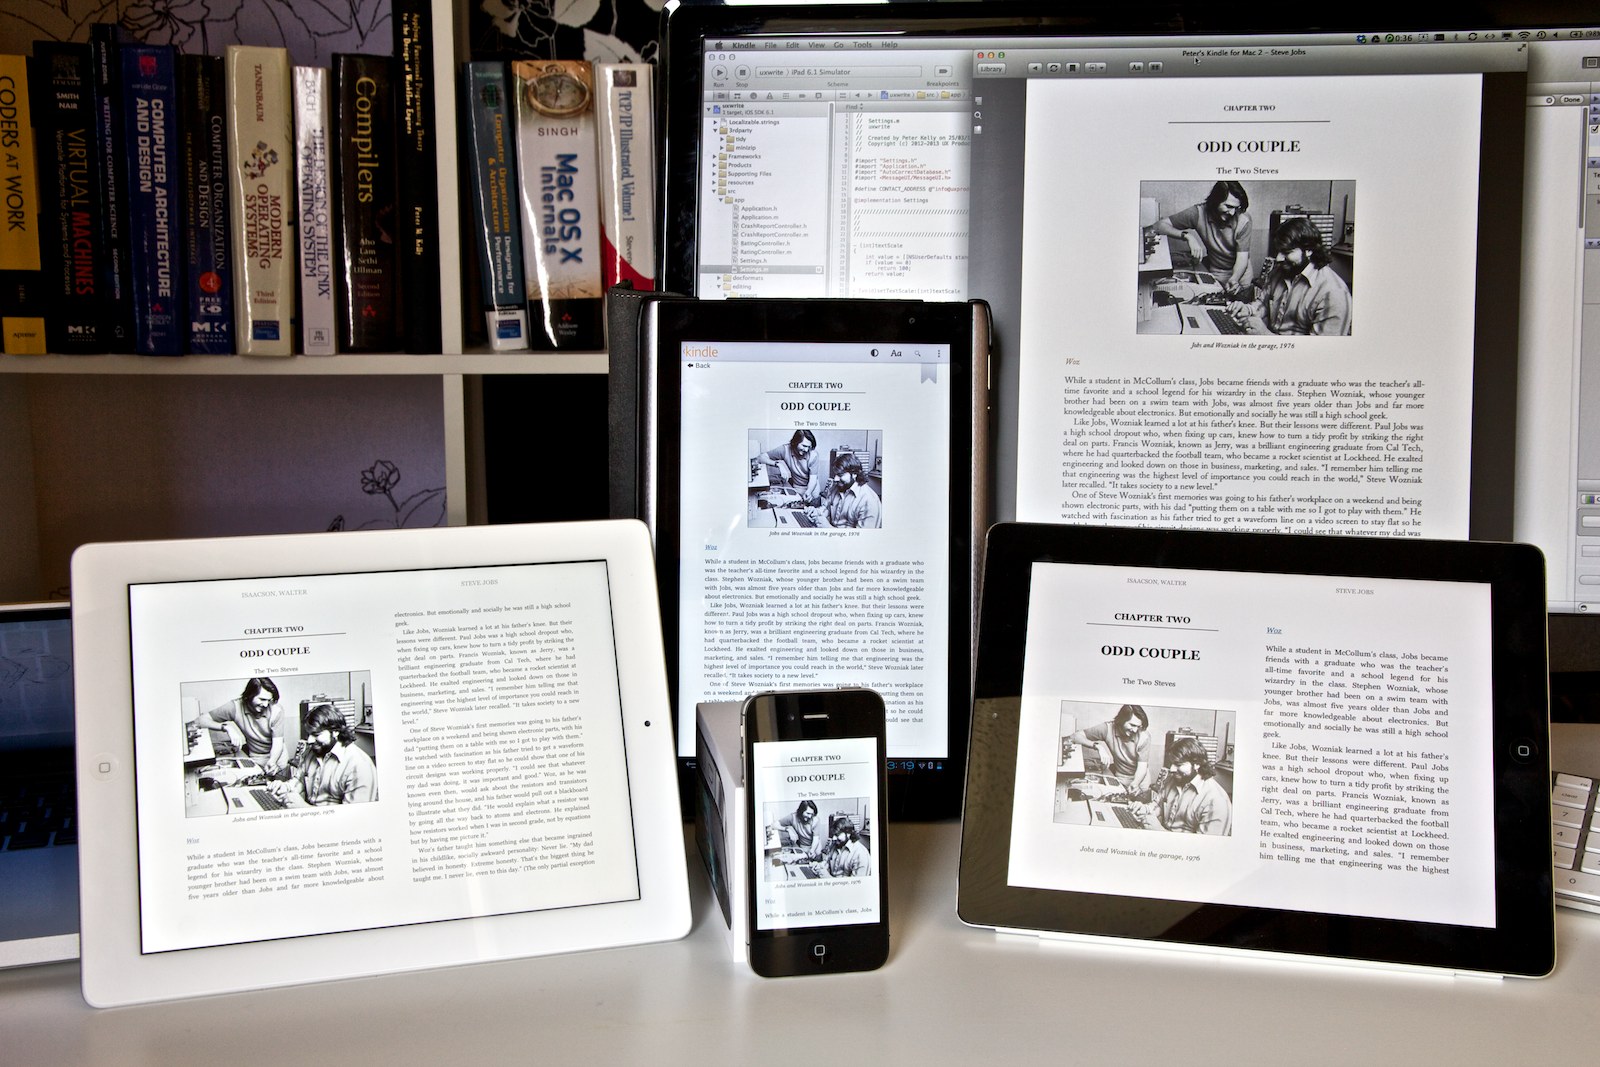
One final point I should mention, and that is very important to understand about UX Write, is that it uses a continuous model of layout with reflowable text. This model is inherited from the underlying web technologies it is based on – every document you edit in UX Write is literally a web page, and is displayed in exactly the same way as it would be in a web browser. In fact, UX Write uses the same layout engine, WebKit, that is used by both Safari and Chrome.

You can’t do page breaks on the web. Every web page is one long piece of content, and you move between different parts of it by scrolling up and down. Additionally, the width of each paragraph depends on the width of your browser window (at least, on well-designed sites); this feature is especially important for phones and tablets which have smaller screen sizes than regular computers. Reading an A4 PDF document on an iPhone or iPad mini involves a lot of squinting and/or scrolling, and really isn’t a pleasant experience. Because of its basis on web technologies, and the fact that UX Write is designed for the small screens present on the iPhone and iPad, it always adjusts the page layout in a suitable manner to make it easy to read, and even lets you choose a scaling factor to make the text larger or smaller, depending on your preferences and vision quality.

If you’re coming from Word, you might find this quite jarring. UX Write is really only WYSIWYG in the sense of what you see is what you get in a web browser, but not what you get in print. During editing there’s no way to see where page breaks will be placed in your document, and you can’t rely on paragraphs being a specific width, because someone reading your document might be using an iPad mini, or even simply rotate their full-size iPad from landscape to portrait, which changes the width of the page.

This approach reflects the philosophy of HTML and LaTeX that content is of primary importance, and layout secondary. Your ideas, your words, and the way you organise them is what you pour so many hours of effort into – what it looks like when you finally publish it is important, but a separate concern that can be dealt with in the final stages before publication. I’m aware that not everyone may agree with this approach, and that’s fine – I’m not trying to cater for every possible usage scenario. In the case of UX Write, I’ve decided to focus on this way of doing things based on the authoring approach I learnt while working in academia, and I consider this approach the right one for many other types of writing as well.

Having said this, I have some ideas about how I might be able to address page layout capabilities in the future, at minimum including the ability to specify explicit page breaks. There are a number of complexities in achieving this, but I’ll be looking into this at some point in the future.

Summary

Wow! You got through all that? Congratulations, and thanks a lot for your interest! As you can see, there are a ton of complex issues here that I’ve addressed over the last few months, which is why it’s taking so long, and why I’m being so careful about making sure this all works reliably before doing a public release.

It’s tempting, from an end-user point of view, to think of word documents as rather simple things that can just be edited easily and passed around – which they are, if you’re only using Word. But since Microsoft haven’t released Word for the iPad yet (and I’m not convinced they ever will, despite persistent rumours), using this wonderful device to do the writing you normally do on your PC or Mac requires someone else to come in and fill the gap. That’s me.

Rather than trying to produce an exact clone of word, I’ve tried to address all these challenges in a way that fits in closely with modern, industry-standard web technologies and caters well for the mobile form factor, as well as providing a powerful environment that makes it as easy as possible to work with the structure of your document. On this last point, I have a bunch of ideas about how to leverage the structured editing approach to provide a range of different ways of navigating and working with the high-level organisation of your documents. But those will have to wait for another post.

As always, comments are welcome.

Update on Microsoft Word Support, Part 1

It’s been a long time since I posted about this so I wanted to give a brief update on where things are at regarding file format support and the upcoming 1.1.0 release of UX Write. I posted back in October that I had decided to support both .docx (Microsoft Word) and .odt (OpenOffice) formats, in addition to the current native HTML format.

As it turns out, the amount of work involved in getting .docx support operational has been much greater than I expected. I’ve been focusing primarily on that over the last couple of months (as it’s the most popular of the two), and have decided that I will release 1.1.0 with .docx support only, and add ODF at a later point in time. While I could delay the release further until I have both file formats working, I don’t think there’s any benefit in doing so. There’s a lot of people waiting on .docx support, so I want to make this available both for the benefit of existing users and because it’s important for the commercial success of the app.

What Does Microsoft Word Support Mean?

It’s tempting to pose the question “Is this app compatible with Microsoft Word?”. It would be nice to give a straight “yes” or “no” answer, but unfortunately the situation is more complicated than that. Microsoft Word has literally hundreds of features, and no other app has or will ever support all of them. All other word processors which work with one or more of Word’s file formats support only a subset of these features. This is typically ok however, as most people only use a small, common set of features rather than every single one.

I’m focusing on supporting only the most important and widely-used features, from the viewpoint of professional, academic, and technical writing — for the most part matching the set of document structure features common in LaTeX (e.g. sections, figures, tables, references), as well as almost all the formatting properties that can be expressed in HTML and CSS. Since all the other word processors for the iPad address the former either very poorly or not at all, UX Write 1.1.0 will likely have the most feature-rich support for .docx on the platform upon its release.

Note that there is a big difference between .docx and .doc files – in fact they are two entirely separate file formats. UX Write will only support .docx, which is a modern, well-documented, XML-based file format that is (relatively) easy to read and write. The older .doc format is a much more complicated binary file format that would be a great deal more difficult to support. I’m aware that some people still use it, and while I could support it with perhaps another six months of work, I feel that time is better spent on improving other aspects of the app. You can easily convert from .doc to .docx (and back again) using any recent version of Word.

Maintaining Document Integrity

The normal way for a word processor to support third-party file formats is to provide import and export facilities. Import converts the document from the third-party format to the program’s native format, and export converts back the other way.

The problem is that this is a lossy process – it is rare for the native format to support a superset of the third-party format’s features, and converting between the two inevitably means you’re going to lose some structural or formatting information along the way. If you look around the support forums for Pages and similar apps you will find many instances of people complaining they’ve lost formatting or other information like footnotes when going back and forth between their iPad and Mac or PC.

UX Write instead uses a technique called bidirectional transformation to interface with third-party file formats such as .docx. Although its native format is HTML, which doesn’t support all the features of Word (such as embedded spreadsheets), and you won’t be able to see or edit these unsupported features, they won’t be lost when you save your document. This is because instead of the saving process completely replacing the original document with a new one converted from HTML, it takes the original document, works out what has changed in the HTML version, and makes the corresponding changes to the original document. This has the following implication:

Any formatting or other features of .docx that UX Write doesn’t support will be kept in-tact on save. You will be able to safely move back and forth between UX Write on your iPad and Microsoft Word on your PC or Mac without losing data.

To understand why this is, let’s have a look at how the traditional import/export process works:

Import - Export

Figure 1: Import/export

Figure 1 illustrates an example of a document containing headings, text, footnotes, and page numbers. When the document is imported, the headings and text (which HTML supports) are maintained, but the footnotes and page numbers (which HTML doesn’t support) are lost. The user makes some changes to the document and then saves it. During save, the export process deletes the original document and replaces it with a new version re-created entirely from the HTML version. Because the latter did not contain the footnotes or page numbers, these are also absent from the saved version.

Bidirectional Transformation

Figure 2: Bidirectional transformation

Figure 2 illustrates the bidirectional transformation process used in UX Write. When the document is first opened, it is converted from .docx to HTML. This is the same process as before, and maintains the headings and text, while losing the footnotes and page numbers (HTML has no notion of separate pages in a document). After the user has edited the file, they save it.

Now here’s where the difference comes in: Instead of completely re-creating the document, bidirectional transformation takes both the original .docx document and the modified HTML document as input, and updates the original based on the changes that have been made to the HTML version. Any changes, additions, or deletions to the headings or text will be applied, but the footnotes and page numbers will be left completely untouched. The user syncs their document with their Mac or PC and opens it in Microsoft Word, and is happy to see that everything is still in place.

Incremental Feature Support

Now that you understand how bidirectional transformation works (trust me, this is a very much simplified explanation of events!), you can see how it is possible for UX Write to support only some features of Microsoft Word, without losing all the other information in your document. In particular, it permits features to be incrementally supported. For example, the first release in the 1.1.x series won’t support footnotes, but this is something I’ll be working on for future versions. In the meantime, while you won’t be able to view or edit footnotes, they’ll at least still be there when take your document back to Microsoft Word on your PC or Mac.

I’ll be putting up another post soon which details the features that are currently supported in the development version and will be available when 1.1.0 is released, as well as others that will be added in the future.

Creating Templates in UX Write

One of the features I’ve had a lot of requests for recently is the ability to create “template” documents, whereby you set up all of your styles in the way you want them, and then all new documents you create will have the same look and feel.

Version 1.0.5 has just hit the app store, and adds the ability to do this, via some additional file management features – specifically the ability to duplicate and rename files. Here’s how:

1. Create a new document, giving it a name like “Template” (you can choose any name)

2. Open the document and configure the styles (go to the formatting menu then “Edit Styles”).

As an example, let’s make the default font Helvetica Neue, change all Heading 1 elements to blue with a bottom border, and all Heading 2 elements to italic blue. We’ll also add custom styles for Title, Author, and Abstract:

Creating a new template – Setting up Styles

3. Now you have your template. Leave the content empty, and go back to the file browser.

4. To create a new document based on this template, press and hold on the template document, and select “Duplicate” from the menu.

5. The document will initially by called “Template copy”, but you can immediately start typing in a new name, e.g. “Project Plan”.

Now you can write your document, format it using the styles you set up earlier, and it will look just as you intended from the template:

Example document created from a template

A Tale of Two Standards

TL;DR: UX Write 1.1 will support both .docx and .odt files. You’ll be able to  edit documents created in Microsoft Word or OpenOffice. (Clarification: .odt support has now been postponed till a later release due to the amount of time it’s taken to implement  .docx)

Now for the full story:

One of the most important things to consider when choosing a word processor is the ability for it to work with documents in a format that is compatible with other programs. There’s a lot of reasons for this:

  • You want other people, who may not have the same word processor as you, to be able to read and edit documents you create
  • You may want to work on your document on different platforms, such as your iPad and Windows PC
  • You probably want to ensure that anything important you write today will still be readable far into the future, even after today’s software empires have faded into history

Historically, most word processors used their own proprietary format, which only they could read and write. If you wanted to share documents with other people, they had to be using the same piece of software. And if you later wanted to change to a different word processor, you couldn’t use it to work with your existing documents, unless it included an import filter. Moving from AppleWriter to WordStar to WordPerfect to Microsoft Word was a pain, because each time, you’d have to start using a different file format. You’d also have to either convert all your old documents — or, more commonly, just leave them as-is, hoping that each new word processor would provide import filters for all file formats that had ever existed previously.

A friend of mine recently told me a story about attempting to recover a copy of her honours thesis that she had written in the early 90s using a program called WriteNow, running under NeXTStep. The application was developed entirely in 68k assembly, so even though she had an Intel copy of NeXTStep that could run under VMWare, it wouldn’t work with WriteNow. As it turns out, my friend is probably the only person in my city who owns a still-working NeXTStation (I got to see it running once — an experience I considered as fascinating as seeing a fully restored steam locomotive in operation). She was able to fire up the 20 year-old machine, open the .wn document, and export it to an RTF file, which could then be read on her Macbook Pro — though none of the formatting information survived the transition.

Even if you stick with the same piece of software, over a long enough period of time, the file formats can change. Throughout its history, Microsoft Word has had a total of five different native file formats (with a sixth on its way). Each time there’s a new release of Word in which the file format changes, there’s a period of several years during which people run into problems when they try to send documents to each other, because the sender has upgraded to a new version but the receiver hasn’t.

Sometimes this can even occur with the latest release of the same program on two different platforms. For example, Pages for the iPad stores its documents in a completely different file format to Pages for the Mac, and a behind-the-scenes conversion takes place whenever you exchange documents between the two. Apple have managed to mostly paper over this with iCloud in Mountain Lion, but on a Windows or Linux machine the only way to access your documents is to manually convert each of them one-by-one using either the iCloud.com web interface, or Pages on the iPad itself.

It’s 2012. We shouldn’t have to waste time messing around with stuff like this any more.

Enter open standards

In the early 2000s, a bunch of industry experts got together in an effort to solve this problem once and for all. The idea: define a vendor-neutral format for word processing documents, spreadsheets, and presentations — and make this format open and available for any software developer to implement. The result of this effort was Open Document Format (ODF), which has been ratified as an international standard by the ISO, and is supported by a wide range of office suites — including Microsoft Office, OpenOffice, LibreOffice, Calligra, and Google Docs.

ODF has been widely adopted in the government sector, where there is particular importance placed on storing data in a format suitable for long-term archiving, and avoiding dependence on a single vendor. Using a proprietary format risks the possibility that 30 years from now, documents that you create today won’t be readable anymore, because none of us have any idea what kind of hardware or software we’ll be using then. By using a publicly available, well-documented file format, programmers in the future can easily develop software to read documents in this format — something that is not at all easy to do with proprietary binary formats.

The only reason you’re able to browse the web and receive email on your iPhone is because the Internet is built on open standards. If Tim Berners Lee, who invented the world wide web (also on a NeXTStation), had used a proprietary, undocumented binary file format that could only be read by a program written in 68k assembly for NeXTStep — well, let’s just say that everyone would be spending an awful lot more time outside, because there would be no Facebook or Reddit or even Google.

“The nice thing about standards is that you have so many to choose from.”

– Andrew S. Tanenbaum

Just as with railway gauges, electrical outlets, and television signals, some people felt that one office document standard wasn’t enough, and what the world really needed was a second one. As the development of ODF progressed, Microsoft decided to create their own competing standard – Office Open XML (OOXML) – which served basically the same purpose as ODF but was closely based on the existing file formats already used by Microsoft Office, and thus easier for them to implement.

Like ODF, OOXML documents are zip files containing a collection of XML files and other content such as images. The two standards are quite similar at a conceptual level, though a lot of the details differ, and developing a piece of software that supports both involves significantly more work than just one.

Microsoft submitted OOXML to the ECMA, and subsequently the ISO, to develop it into an international standard. To their credit, this was a major step forward from their earlier efforts to prevent competitors from being able to work with their file formats, and the use of XML made the format immensely easier to deal with in comparison to the binary .doc, .xls, and .ppt formats used previously. However, the submission and process surrounding it met with a great deal of criticism from many on the standards committee and the industry in general, and was initially rejected. Only after the specification was significantly modified to remove the dependencies on legacy and poorly-defined features (such as the autoSpaceLikeWord95 formatting option), was it finally accepted.

The result of this however was not just one standard, but two — “OOXML Strict” and “OOXML Transitional”. The strict version is what finally convinced a sufficient number of committee members to vote for its acceptance, while the transitional version (essentially the original submission that was rejected) got tacked onto the end on the condition that it would only be used for representing documents converted from older formats, not for newly-created documents.

Currently-shipping versions of Microsoft Office only fully support the transitional version of the standard, not the strict version. Office 2010 can read strict documents, but not write them. The upcoming Office 2013 finally adds the ability to both read and write strict documents.

What about HTML — you’re using that already, right?

Yes.

UX Write currently, and always will, use HTML as its native file format. The main reason for this is that it uses WebKit as its layout engine. Writing a layout engine like this is an insanely huge task, and WebKit is an extremely mature engine that been continuously developed for more than twelve years. I’m not sure how many people have been involved in that time, but I would estimate it’s probably had between 100 and 200 man years put into it. Without WebKit, it would not have been feasible for me to develop a program with the functionality of UX Write in one year by myself. In fact, most of the credit for UX Write really belongs to the WebKit developers, since writing the layout engine is most definitely the hardest part of building a word processor.

HTML has two other significant benefits:

  • Its syntax is really simple. You can edit HTML files in a text editor, and it’s very easy to learn. Compared to ODF and OOXML, which both have very complex XML structures, HTML files are small and easy to work directly with by hand.
  • It’s the “lingua franca” of the web. Every web page you’ve ever visited is in HTML format (except for a few built in the recently-deceased and little-mourned Flash), and if you’re publishing online there is no conversion step necessary if you’ve originally created your document as a HTML file. The EPUB standard for e-books is also based on HTML, so it’s ideal for publishing on e-readers as well.

Despite these benefits, HTML is rarely seen as a “word processing” file format — and for good reason. HTML lacks many of the features you typically need for word processing tasks, like headers, footers, footnotes, citations, automatic numbering, and automatically generated tables of contents. All of these can be “faked” using manual editing or javascript (which is what UX Write does in the last two cases, and will do for others in the future), but there’s no way to represent these features in a way that will be recognised by other HTML editors as anything other than regular text. So if you need these features, you’re better off using ODF or OOXML.

Choosing sides — or not

From the above description, you’ve probably got a pretty clear picture of where I stand on file formats. However, let me address one remaining factor: pragmatism.

The reality is that despite the best efforts of many in the industry to promote ODF as “the” standard for office documents, OOXML is by far the most widely used of the two. Even though Microsoft have fully supported ODF in the Windows versions of MS Word since Office 2007 SP2 (though sadly not on the Mac), the default save format is .docx, so that’s what almost everyone saves in (and therefore expects to be able to access on their iPad). It’s been clear to me from the beginning that developing a word processor that can’t open .docx files is a pretty good way to ensure failure, so including this support has always been part of my plan. This was reinforced when I initially released the app and sent a pitch to Walt Mossberg – one of the tech industry’s most respected journalists – and received a very brief reply in which he cited the lack of Word support as a “very, very serious downside”.

Also, in looking into the technical details of both file formats, my opinion (so far) is that OOXML isn’t actually that bad. Sure it has its flaws, and there are some bad design decisions here and there, but both ODF and HTML have their share too. I estimate that the amount of work required to support OOXML is about the same as for ODF, and while there’s more complexity than strictly necessary, it actually has a pretty sensible design (note: I’m referring only to the word processing portion of the standard; spreadsheets are another story).

One clarification I should make is which version of OOXML I’ll be supporting:

“Anyone who claims that their product supports `OOXML’ in an unqualified sense, without stating which conformance target or conformance classes they are supporting, is not stating anything of substance. It is like trying to buy an electrical plug adapter by just saying `I need electricity’”.

Rob Weir

UX Write will only support the transitional version of .docx. There is zero point in using the strict version, because the only product that supports it is Office 2013 (which isn’t even out yet), and due to the several-year lag times involved with people upgrading to new versions of Office, I anticipate that transitional will remain in use for quite a long time. Furthermore, Office 2013 saves as transitional by default (at least in the current preview version), so that’s what almost everyone will use. And since OOXML Strict is a different file format to OOXML Transitional, if you are going to switch formats, you might as well go to ODF, which has much broader support.

So if .docx (transitional) has become the de-facto standard, and is technically relatively ok, why not just support that, and forget about ODF? I’ve been given strong opinions on both sides of this question, but I decided a while back that supporting ODF made sense, for several reasons:

  • First and foremost, everything I’ve said above about open standards. OOXML is “open” on paper — it has been formally certified as an ISO standard — but if you read into the politics behind its development you’ll find that the process fell far short of the openness and level of cooperation typically found in ISO standardisation efforts.
  • ODF is supported by a wide range of applications, and used by a lot of people. Many state and national governments have adopted the format, and OpenOffice has reportedly had over 100 million downloads. That’s a lot of potential customers for UX Write, and I don’t want to ignore that part of the market.
  • Due to the technical similarities between the two, I’m able to use the same implementation techniques for both formats. Doing both formats instead of one is maybe 30-50% extra work, not 100%.

So I’ve said my bit about open standards, but from here on I’m mostly going to be focusing on the technical aspects of the formats and making sure they’re both supported equally well in UX Write. Which of these two formats you prefer is a decision for you to make, and whatever you choose, UX Write will work fine with it. As I continue to add features like footnotes, bibliographic citations, and equation editing, I’ll be doing them in lock-step with both formats, so both will work just as well.

Work on both formats is progressing well, and all the foundations are in place, along with basic editing capabilities. It’s going to be a while yet before I have a release out which supports these two formats, but I anticipate having a version available to beta testers within the next few weeks. When I get time (which is not very often, due to how busy I am with development), I plan to post some more details on what I’ve learnt from implementing the two formats – in particular comparing how each of them represents various features.

LaTeX users, I haven’t forgotten about you

This post is already long enough, but I want to make it clear that I still plan on adding LaTeX support. As someone who’s spent many years in an academic research environment (in the School of Computer Science at Adelaide University), I’m well aware that LaTeX is the de-facto standard in many scientific and engineering fields. I wrote my honours and PhD theses, as well as all of my research papers and course notes, in LyX (a graphical front-end to LaTeX). If it wasn’t for the fact I’m developing UX Write, I’d likely never consider using anything else.

However, I consider this a less-urgent task than ODF/OOXML, particularly since UX Write is based on a semi-WYSIWYG model, and many LaTeX users prefer to write code by hand. After the above two formats are done I’ll be working on other features like find & replace, spell checking, and citations, but LaTeX is still very much on the roadmap. In the meantime, you may be interested in checking out Texpad, the developers of which have recently gotten the first successful port of LaTeX to iOS working.

For the three of you who are still reading this

One of my favourites from XKCD:

XKCD: Standards

UX Write version 1.0.3

I’ve just released a minor update to UX Write (version 1.0.3), which allows it to run full-screen on the iPhone 5. You can grab it from the app store now.

It also includes the following bug fixes:

  • Incorrect toolbar display in file browser iPad w/iOS 6 when rotating the device
  • Incorrect heading numbering when adding a table of contents after one or more other headings
  • Inability to remove border settings from an existing style
  • Incorrect style being shown in formatting menu after pressing enter

Additionally, it adds support for the Cmd-B, Cmd-I, and Cmd-U (bold, italic, and underline) keyboard shortcuts with external keyboards. These only work under iOS 6, as detection of these shortcuts requires operating system support.

UX Write version 1.0.2

For much of the last few weeks I’ve been focusing on bug fixes in UX Write. While I’m keen to get additional features in – most notably .docx and ODF support – I consider stability to be very important and there were quite a few bugs and usability issues in 1.0.1 that really needed to be fixed. I’ve been spending some of my time on file format support, and am making sufficiently good progress that I was considering waiting until that was complete before doing another release. But I figured that now all the really noticeable problems (at least those I’m aware of!) have been fixed, I decided to submit an interim update. I’m happy to say that it’s just been approved by Apple, and you can now download it from the app store.

Here’s a full list of all the changes in version 1.0.2:

Bug fixes:

  • Incorrect margins when printing or exporting to PDF under iOS 6
  • Incorrect handling of style and list changes in HTML files exported by MS Word
  • Inability to delete a link or reference in some cases
  • Inability to open files whose name contains a question mark
  • Inability to use Cmd-A (select all) keyboard shortcut with external keyboards
  • Blue selection highlights remaining in file after save or paste in some cases
  • Bracket and double quote keys not being updated properly after pressing backspace
  • “Go to” menu item not working for mailto: links
  • Crash when using double-tap-and-drag gesture
  • Crash when triple-tapping the margin area next to a table
  • Crash when adding new line at top of file and pressing space
  • Crash when editing figure properties if image width cannot be determined
  • Crash when turning off figure or table number when the cursor is inside the caption
  • Crash when deleting table of contents, pressing undo, and deleting it again
  • Crash when encountering certain types of CSS styles exported from other apps
  • Crash when encountering an invalid HTML table structure
  • Crash when using iOS’s built-in typing shortcut replacement
  • Crash when encountering two files with the same name but different capitalisation
  • Text fields: Cursor always placed at end even when typing earlier in text
  • WebDAV: Inability to connect to servers that use digest authentication
  • WebDAV: Inability to upload files on some servers
  • WebDAV: Empty directory listings on some servers

Performance improvements:

  • Improved document load speed by a factor of 2
  • Run autosave in the background, while you keep on typing
  • Fixed severe performance problems when editing large HTML files exported by MS Word
  • Fixed severe performance problems when saving large HTML files exported by LaTeX2HTML

Usability improvements:

  • Made it easier to select and delete tables, figures, and table of contents
  • When typing ” using the external keyboard, replace with “ or ” as appropriate
  • Allow ” character to be entered by pressing ” twice (e.g. for expressing inches)
  • Auto-capitalise “I” and similar words like “I’ll” or “I’d”
  • Formatting menus: Dismiss automatically once a value is selected
  • Web links: Use selected text and URL from clipboard when displaying insert view
  • File browser: For conflicts, display a message and offer to rename the file
  • File browser: For file-specific errors, show error message when tapping on status icon
  • File browser: Display server connection errors at the bottom of the screen
  • WebDAV: Optional diagnostics mode for troubleshooting purposes

Thanks to all of you who have submitted bug reports – in particular those which contain info on how to reproduce the problem (which can be extremely helpful in some cases). I appreciate your patience with getting these problems solved, and I think you’ll find that 1.0.2 is much more usable than the previous release.

Now that I’ve gotten these out the way, I’m focusing pretty much all my time on getting support for .docx and ODF implemented. I’ll have a lot more to say about this in future posts – stay tuned!